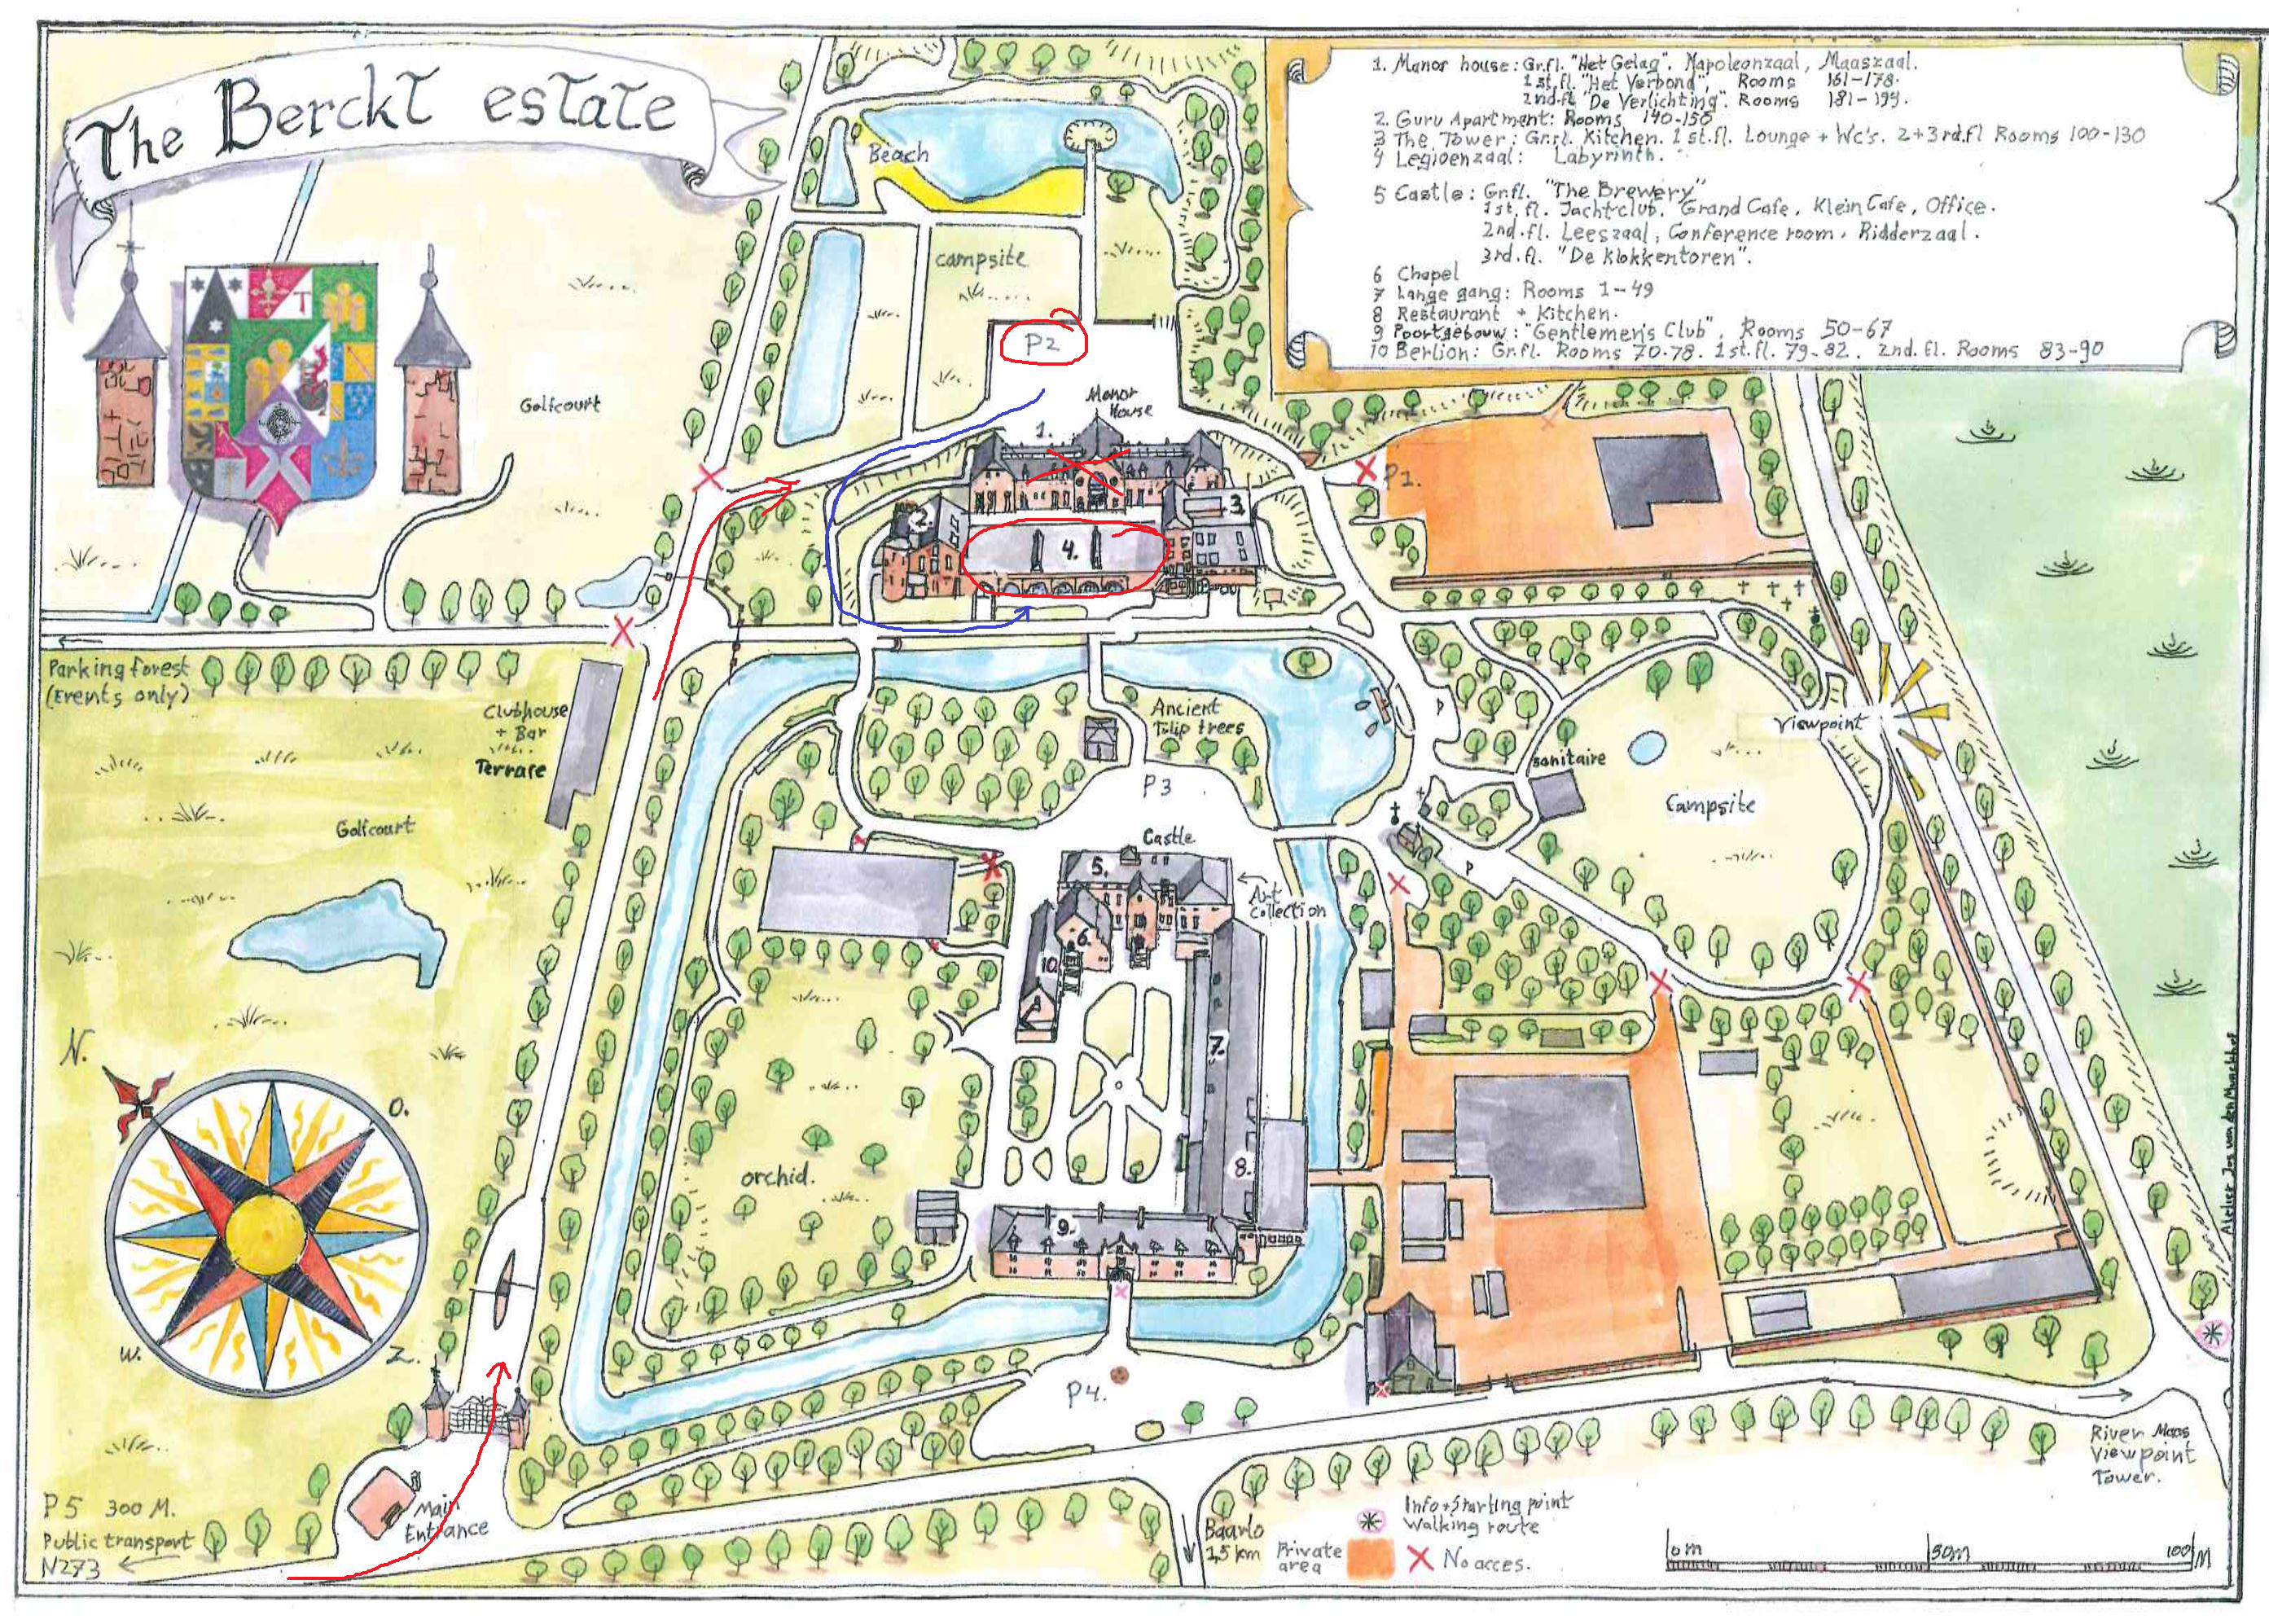
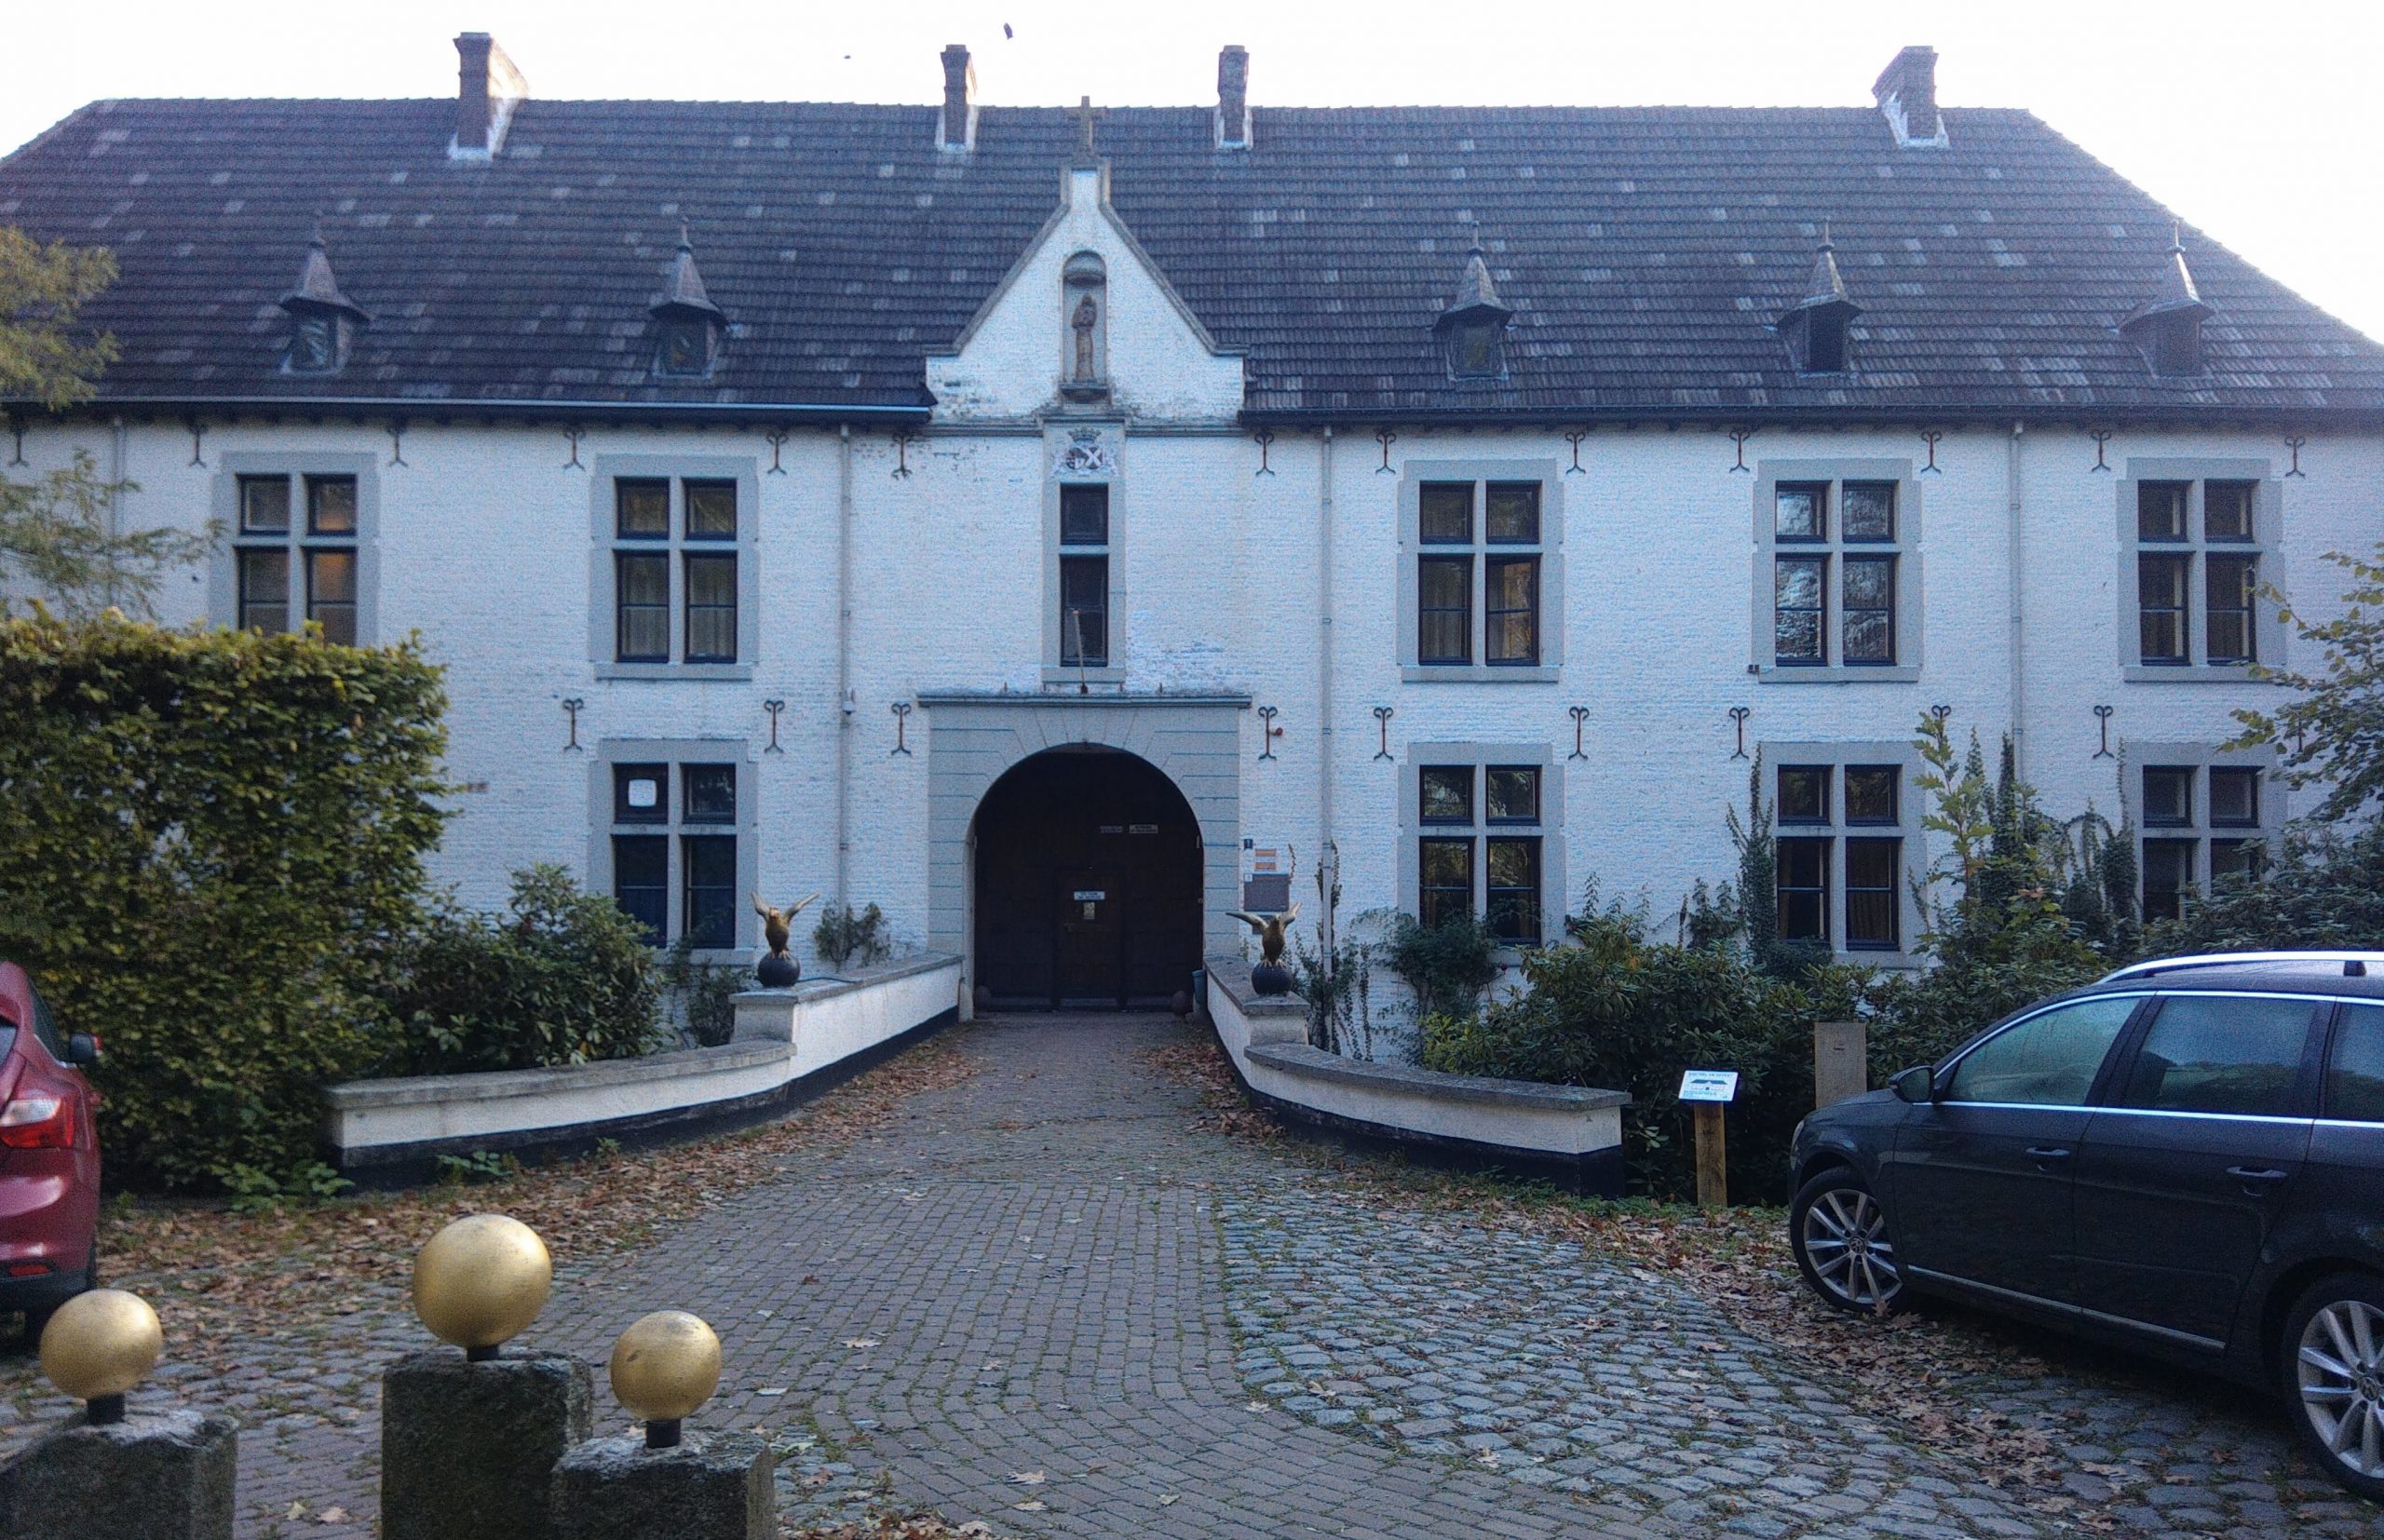
The first sign you will see from the road.Enter through the side guard gate. If you are by foot and the gate is closed, enter through the main entrance.Drive straight through to the end, then right turn into the parking area two (P2).
After parking, walk back the way you came and head over to the conference hall (Legion Hall).
Please, do not walk through the Manor House from the parking area, as another group has rented that hall and terrace, and we don’t want to disturb them.
This is the Legion Hall and The Tower. We have this whole building!Alternative view from behind the main castle buildings, on the other side of the moat.Here’s a photo of our presentation hall. We will also run our competitions here.Here’s the dining hall.
In case of doubt, please call the organisation or use street view.
Editors note: We were recently reminded of the writeup from Michael Maynard (Aka Gorilla picking) on his experience at LockCon 2018. Michael gave us permission to share it with a larger crowd. We have shortened the report, slightly. Where the full report is on the UK locksport forum.
In 2018, LockCon was held in the old parts of the castle, while in 2019 we used exclusively the new building. The rooms are much nicer, and we have a lot more room for events. This year, 2022, we will have the new building once more.
Michael: I was there as a guest of the OzSecCon – I won their picking comp and the prize was a trip to The Netherlands, for which I am eternally grateful. This trip changed my life, and I don’t think this is an exaggeration frankly – my horizons have been broadened immeasurably and my sense of what is possible both in the lockpicking world, and in life in general – have been given a serious shakeup. Living in a small town at the arse end of the world is all very well…but you do come to realise that you’re only seeing a very tiny fraction of the world and you get very limited by your environment.
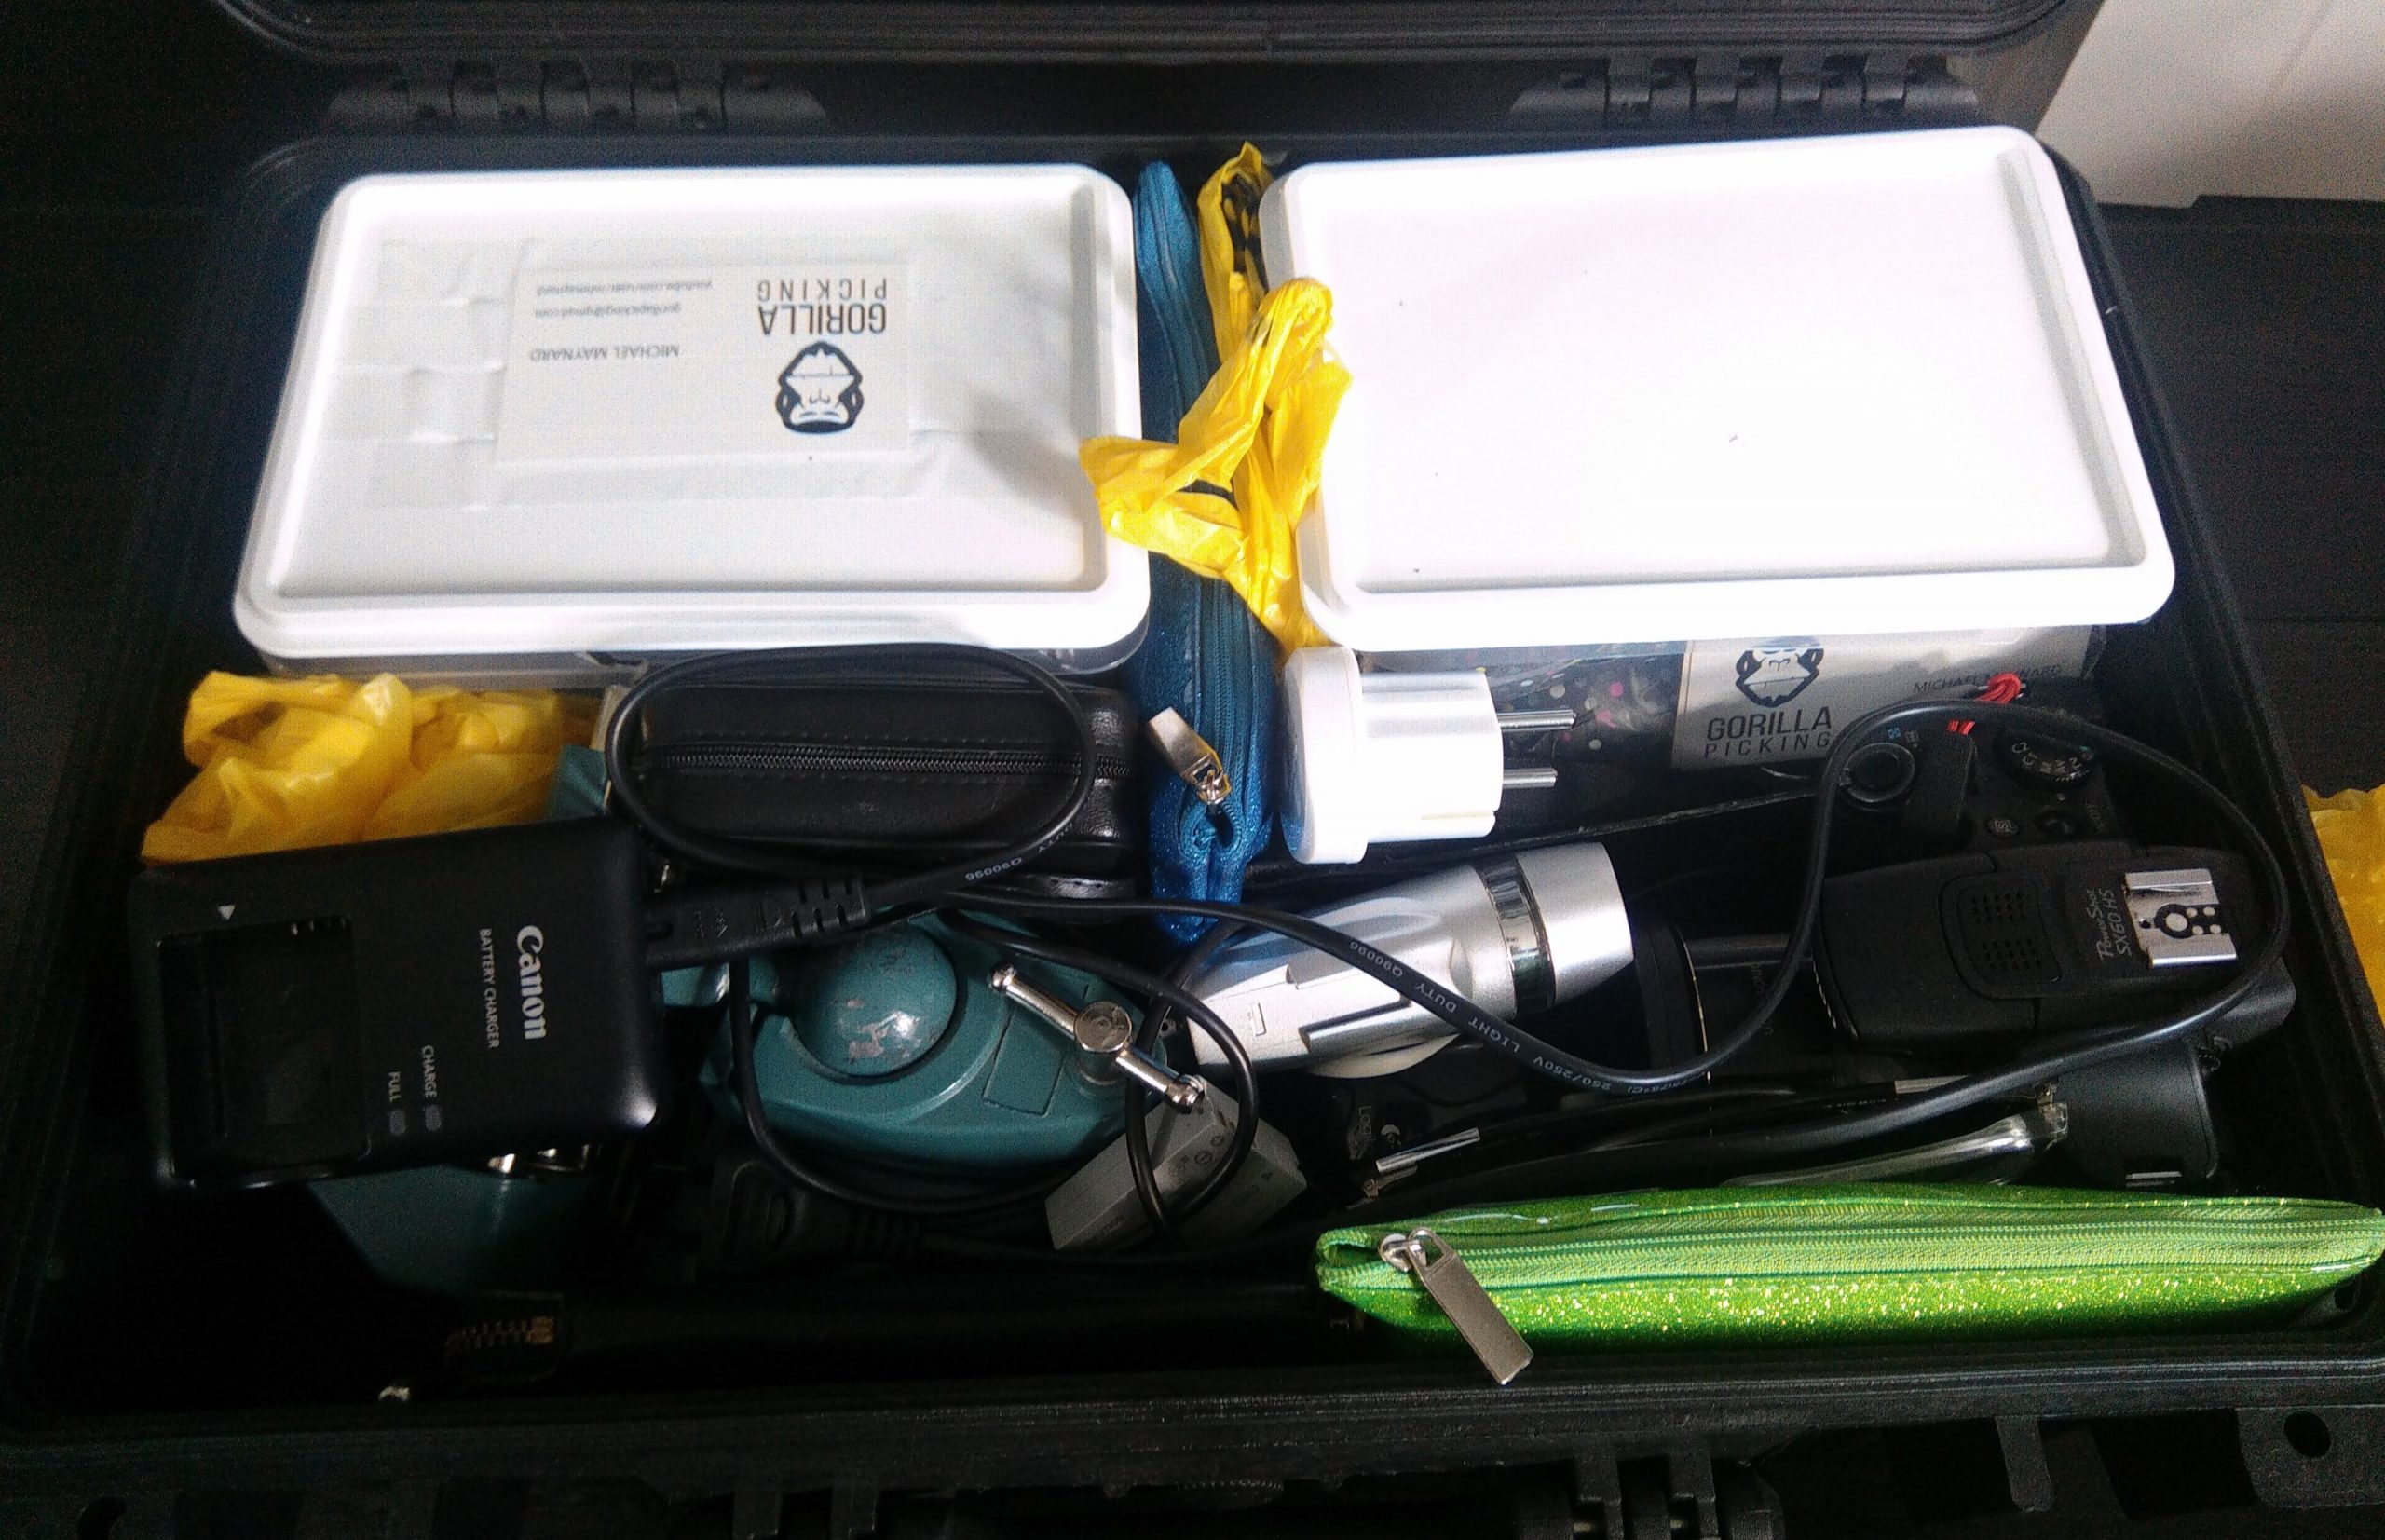
I hate suitcases (don’t own one in fact) but it was clear that 15kg of locks and tools were never going to survive in the pack unprotected so I stuck all my tools and locks in a Peli case… and then that went into the bottom of the pack. The locks were in those two Tupperware containers and BOTH of those managed to get destroyed, even inside the peli case which in turn was inside the pack. Who knows how baggage handlers manage to do this.
Daypack had laptop plus a book to read and usual stuff you take on planes and was packed so that I could put it into the top of the big pack for ease of carrying. So allup load wandering point to point was 15kg lock stuff + 7kg normal stuff + 5kg daypack = 27kg / 59 lbs.
OK so, first stop is Amsterdam. I’ve been here once before on a flying visit about 30 years ago.
This time I have to say it was fantastic from the second I arrived at the station. I booked my accommodation online with no real clue what I was getting but it turned out to be awesome, a serviced apartment on a canal. This is the view from the window. Across the bridge (maybe two minutes walk) were a Kiwi-run breakfast place, a truly excellent pub which I spent a great deal of time in, an Indonesian place, a pizza place, and more people whizzing about on bikes than you could poke a stick at. Dutch girls on bikes are – er – memorable.
Yeah so the city is drop dead gorgeous, very photogenic with the canals and architecture and museums.
I could put a million touristy photos here but if you’ve been to Amsterdam you know what it looks like, and if you haven’t, the pics will not do it justice. So here, have a random canal.
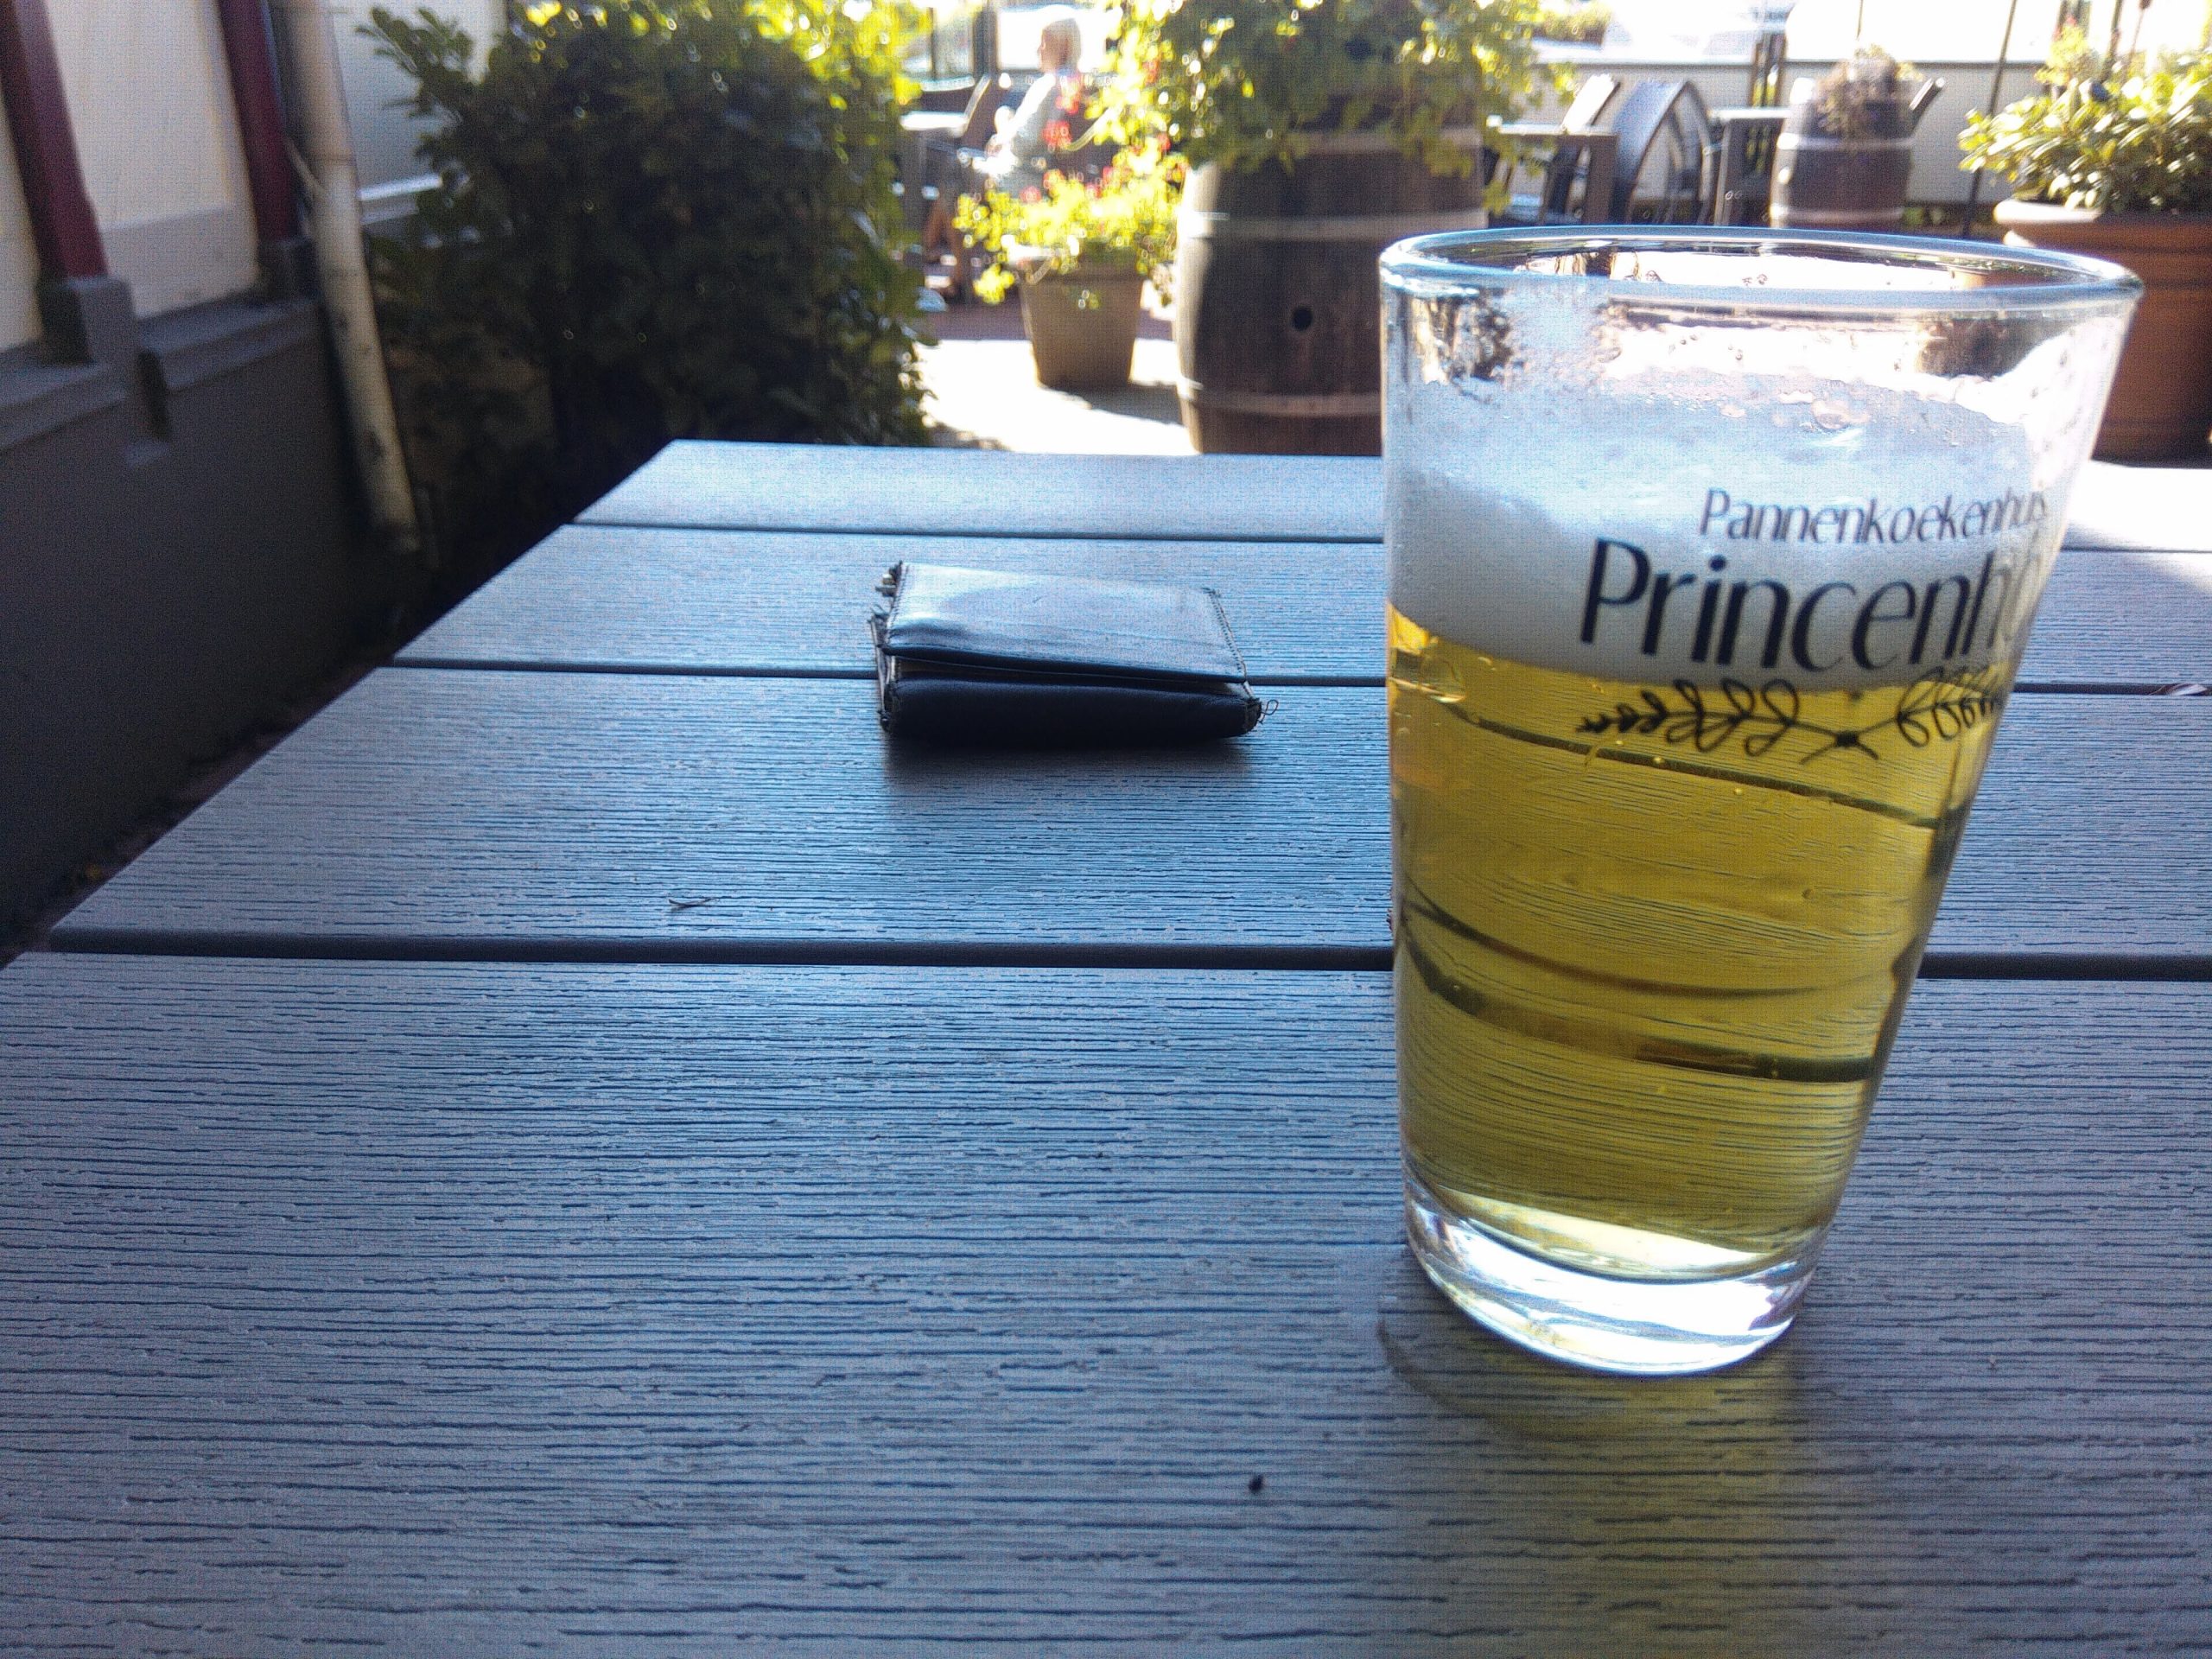
So when we last met the gorilla, he was sitting having this beer (and a few more) at a small pancake house opposite the train station near Jan’s place, ie the middle of nowhere.
Jan turned up and we levered my pack into the back seat along with enough impressioning equipment to start a good sized locksmithing trade school, and had a happy 90 minute trip southeast along the motorways towards the Netherlands / German border. Well not so much happy I guess, as eye-wateringly terrifying. The Dutch and Germans are incomprehensibly bad motorway drivers and in particular will swerve across to change lanes for absolutely no apparent reason and no prior indication of intent, like a fighter pilot in a dogfight. The speed limit along certain sections is 130 and following distances are comfortably measured in thousandths of an inch. I have no photos of the drive because I was using both hands to hang onto the seat.
Eventually the countryside changed from built up industrial areas and agriculture to reasonably dense forest. The windmills died out altogether and from this I assumed that we were headed inland away from the coast, and that had I had a GPS with me it would have shown us to be 0.00000000001mm above sea level, a new personal record for me on my trip.
The castle really is a very, very splendid thing. Wikipedia tells me that there has been something – castle / manor house / fortification / whatever on this site since the 13th century, and that this particular building was built in 1838 atop the ruins of previous structures. Now for you northern hemisphere types, this probably isn’t too great a deal but for those of us in the colonies, it’s frankly a bit of a mind fuck. The Treaty of Waitangi – NZ’s founding document – was signed in 1840. So this building I’m staying in is older than my entire country.
I really wish these walls could talk. They’ve seen over a century of young blokes about to take holy orders as a monk trundling across the bridge with their only possessions clutched in hand – a Bible, a prayer book, and perhaps a filthy habit. What they would think about a hundred hairy arsed* lockpickers carting many kilos worth of housebreaking equipment into the hallowed cloisters, I can only imagine.
Thursday afternoon. You arrive in dribs and drabs, file in, find the attendance register, tick your name off, and collect your key. People who had attended this event before came armed with bespoke locks, and so within seconds of Jan collecting the bunkroom key he had whipped out a screwdriver and changed it for an Assa twin. Quite why anyone would want to break into your room while you’re away from it during the day I never quite fathomed; I mean what the hell are they going to do? Nick your picks? Nobble your best impressioning file?
I didn’t happen to have a spare 30mm high security Europrofile cylinder with me so my room was open to the ravages of anyone who cared to poke a pick in the keyway. In the event no-one saw fit to rummage through a week’s worth of curry-soiled underclothes and third-hand Lockwood cylinders so I think I might have got off lightly.
The accommodation was, of course, the monk’s cells and there were an absolute ton of them. It’s a big building. The rooms were all the same size, but depending on how much you spent you got more or less personal space.
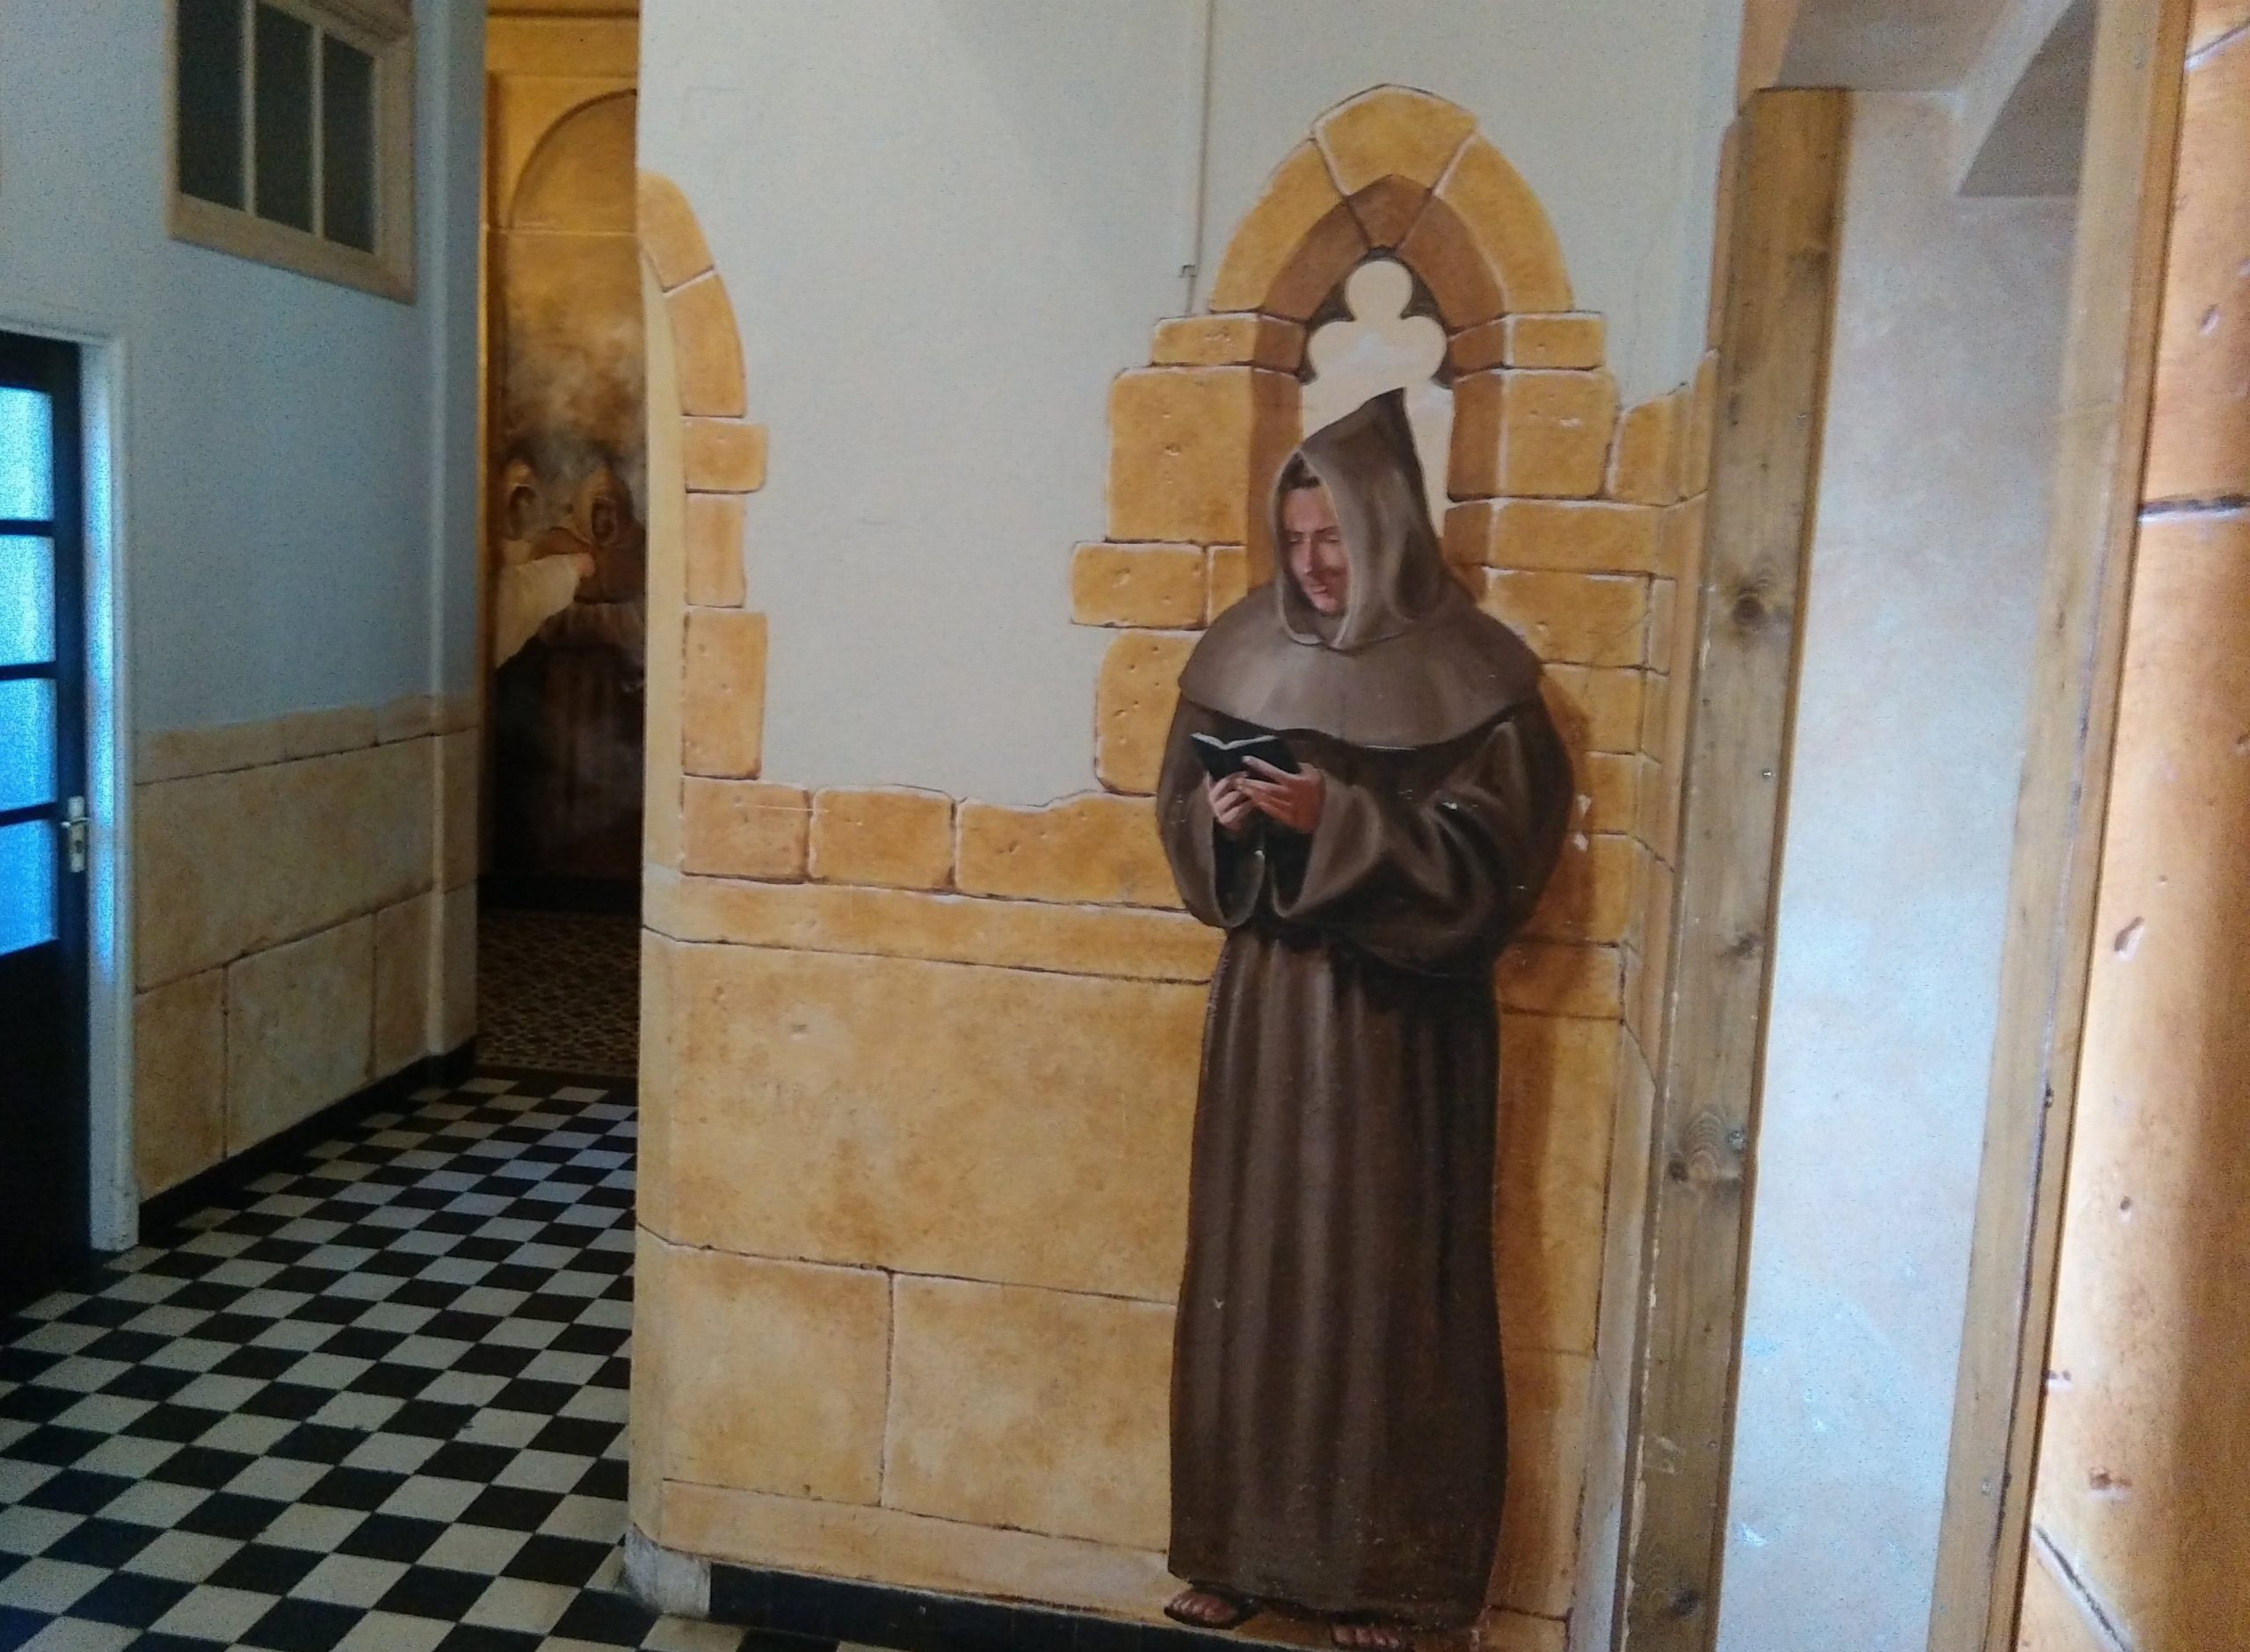
The inside of the complex is exactly how you’d expect an old monastery to be. Or at least it’s how *I* expected it to be, but there again I’ve never been inside a real monastery so what the fuck do I know? Tiled floors in some parts, old stone flags in others. Themed murals on the walls, Nooks, crannies, staircases going nowhere and mysterious doors that open out onto nothing in particular. Absolutely magical, honestly.
And now, dear lockpicker, we come to the most important part of the whole trip, the conference itself.
Now there is one thing I have to cover right at the start: The organisation was kind of loose. People shambled about and came and went at all hours, the timetable was – er – fluid – to say the least, meals were infrequent and informal.
I’ve thought about this a lot and in the end I’ve come to the conclusion that the event has deliberately been kept relatively laissez faire, I think it’s a deliberate policy by the organisers. These are very clever, very efficient men who could happily organise a well oiled clockwork machine of a conference if they wanted. But you know what? The LockCon started as an unstructured gathering of like minded friends, and they’ve done their best to keep it that way. It’s limited to 100 attendees of which 85% are Toool members, with others like us by invitation. God knows they could sell three times the number of tickets at double the cost if they wanted to and have a massive event, but they’ve chosen to keep it the way it is and on reflection I think that’s great.
There was a great deal of sitting about both in the lecture hall and outside at the picnic tables. For me I think this was the highlight of the weekend. Where else can a shitload of locksmiths / hobbyists / industry insiders / hackers / red teamers / partners / children from any and all walks of life and parts of the globe all sit around and talk locks? Everyone had a story to tell. Everyone had a point of view. Everyone had a new thing to show or tell about or whatever. Mechanical guys talked to electronic hackers. Safe guys swapped ideas with pickers. Locksmiths shared tricks with hobbyists. I came away with a whole new perception of what’s new, what’s doable, and what’s interesting.
Now, the lectures. These sort of weren’t what I was expecting. I was expecting formal, high powered presentations but in fact it was more like a show and tell style thing. Again, I think this comes from the original intent of the conference which was an informal get together of geographically spaced out friends. The idea is that anyone can get up and share stuff they’ve been working on, at whatever level they choose.
There were industry guys. There were historical presentations. There was a fair bit of mechanical stuff. There was some very interesting discussion of photographic scanning and 3D printing of keys. The stars of the show were Moss and Boo, two Aussie kids whose big thing is getting into tamper-evident seals. They spoke in Melbourne as well and really are very good and were listened to with as much enthusiasm and respect as anyone else.
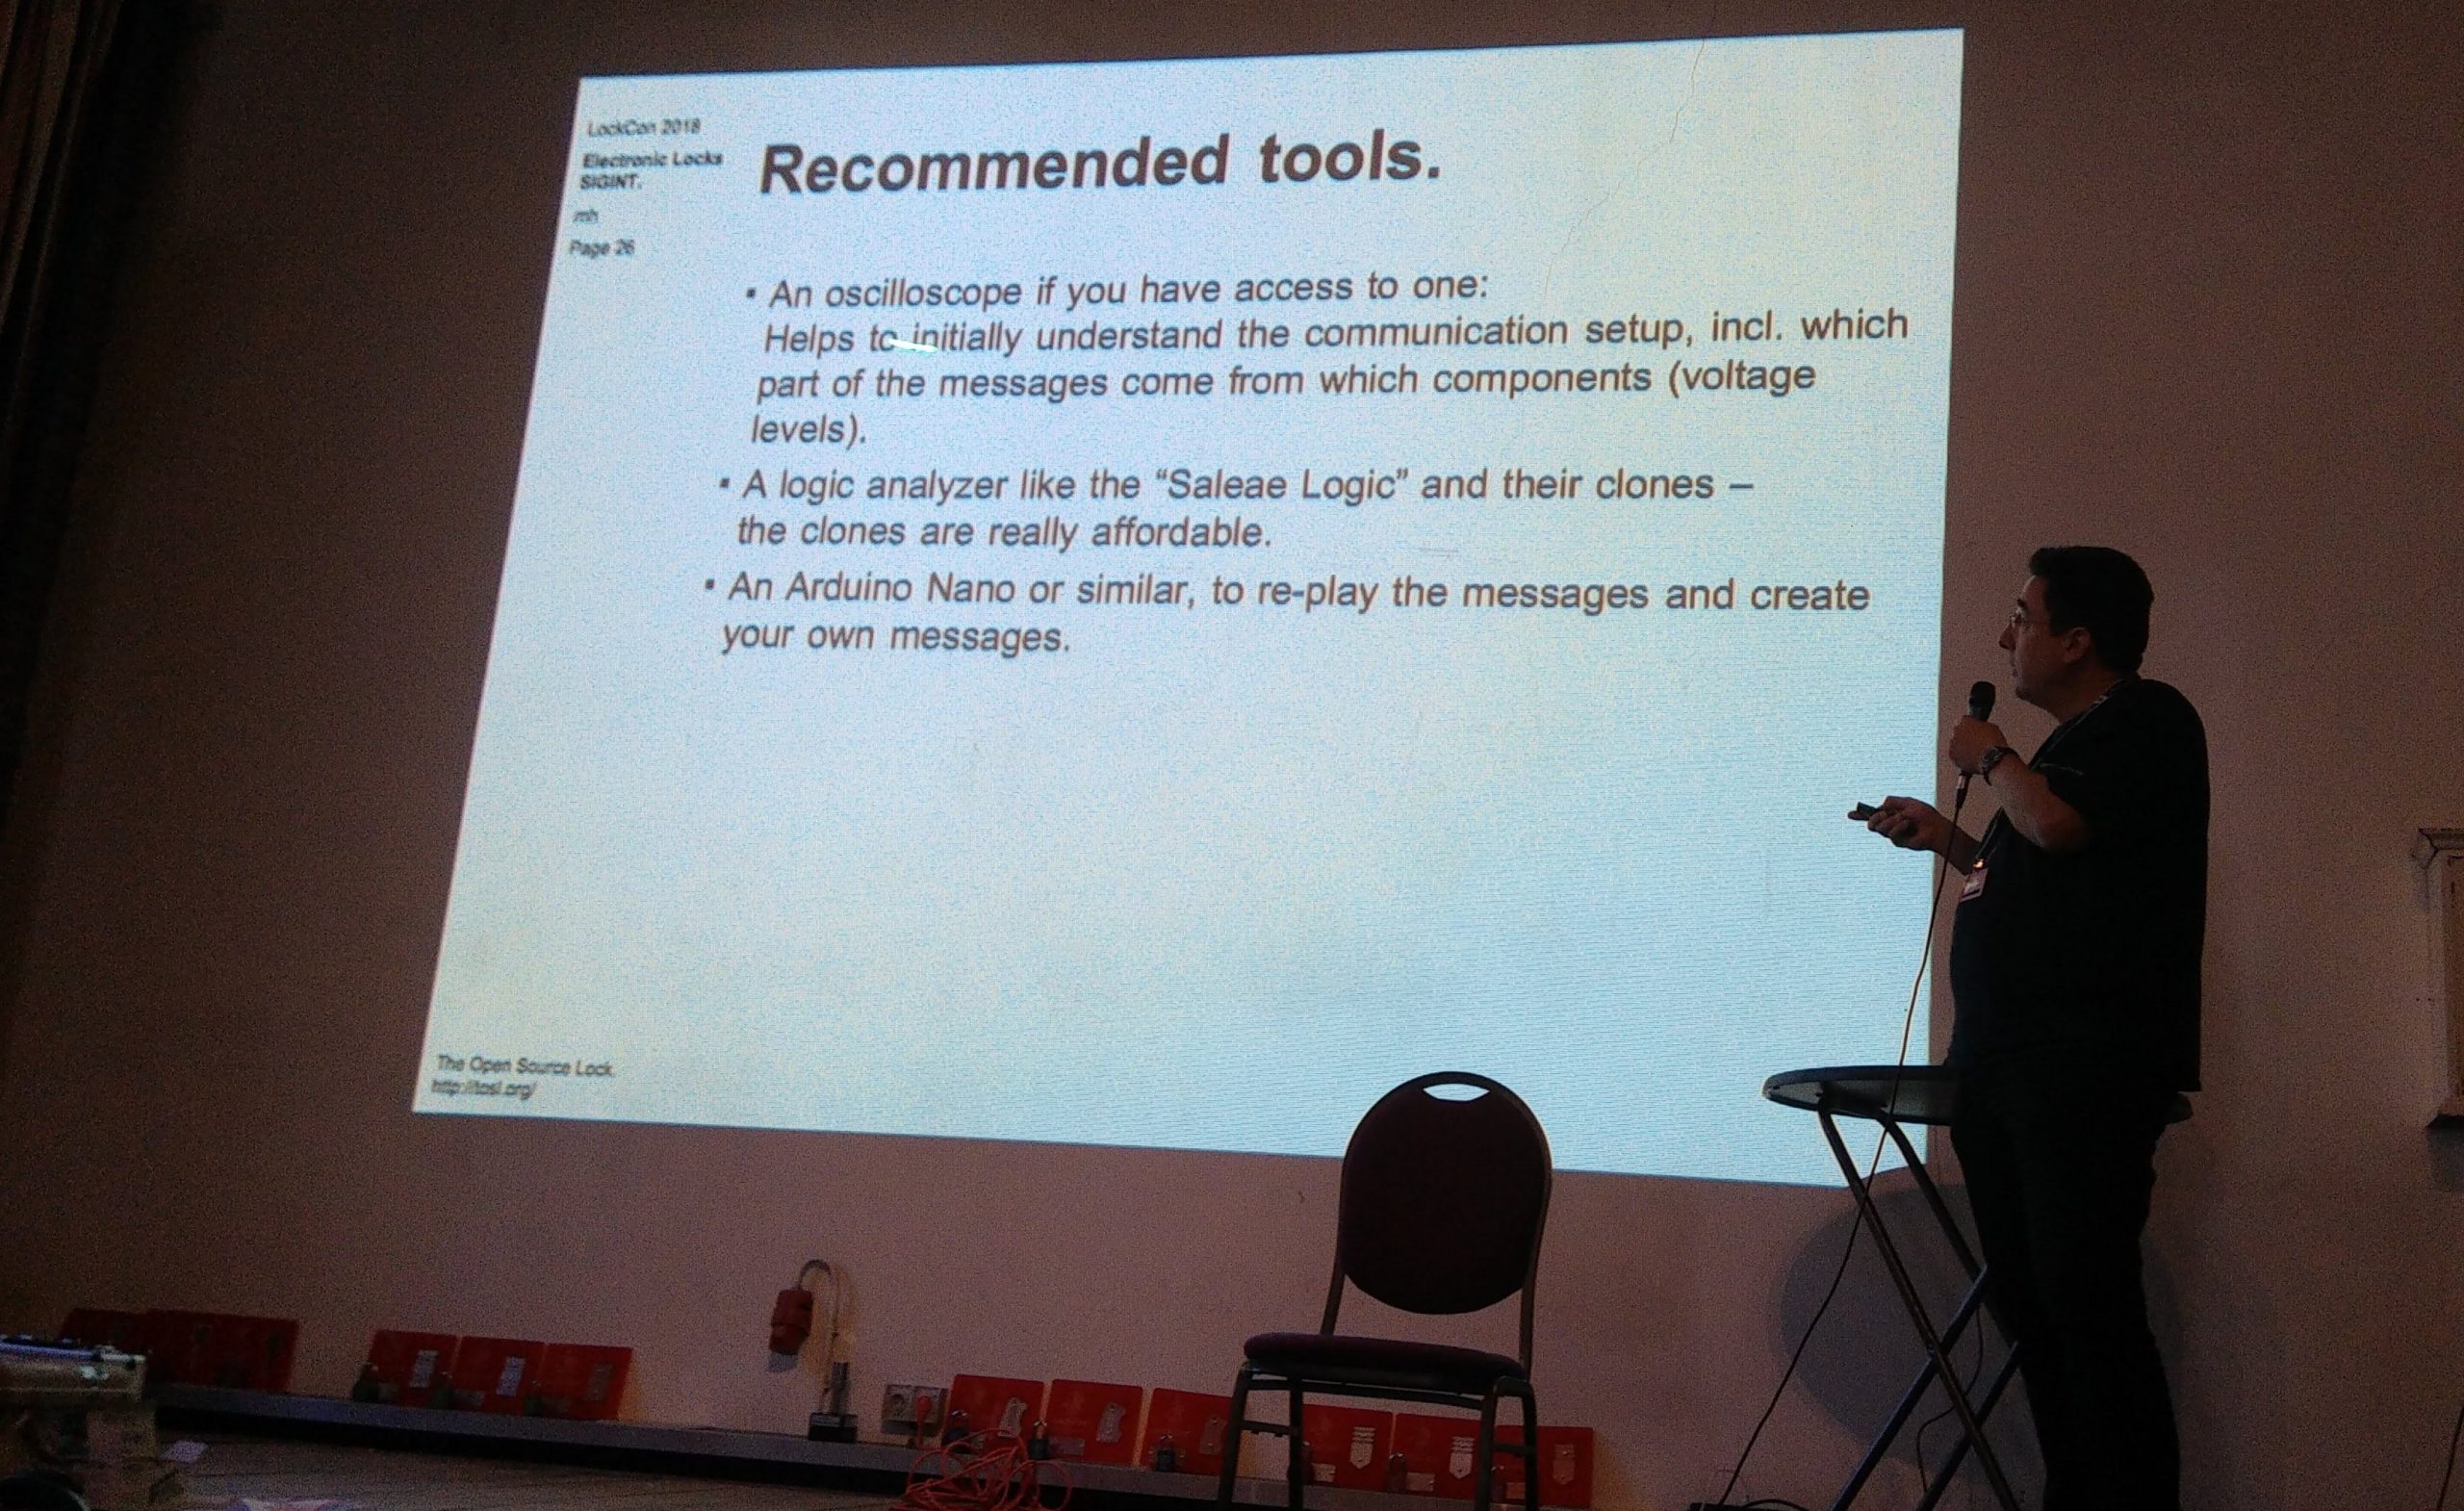
This is MH who was happy to have his pic in the public domain.
Finally, the competitions. Impressioning, pin picking, and lever picking. Goddamn, there are some VERY talented people out there and trust me when I tell you the Europeans have picking comps down to a fine art.
The rules were weird at first – you can hold and tension the lock any way you want – including holding it in your hand and tensioning from the cam. And you can attack the lock with pretty much anything short of a drill bit which meant that a lot of the good guys were doing a thing that was a cross between raking and zipping – just violently having at the lock for all they were worth with something sharp and pointy before trying to single pin pick it. This led to some sub five second opening times.
We say our goodbyes and Jan and I pile our shit in the car and hit the road. My pack weighs slightly less than it did on the way in but it’s still near the 23kg limit and I’m still weighed down with a huge stack of brass. The two heaviest things in my luggage are my old school laptop in my daypack, and the locks in my big pack.
Jan introduced me to the concept of savoury Dutch pancakes, which are basically a foot diameter pizza with the usual toppings (cheese, bacon, peppers, whatever) but with a pancake for the base. You then add syrup to this, or at least I did. Dutch food turns out to be remarkably delicious but stodgy, and if I lived here for any length of time I would be the size of a zeppelin despite any amount of bicycle riding. This is where I discovered that diabetes might just be an acceptable lifestyle choice.
36 hours of longhaul flights, airports, delays, and security theatre. I was jetlagged to hell when I got back – I always am – by the time I got to Napier I’d had three mornings in one and a half days and if that doesn’t bugger up your body clock, nothing will.
Is normality actually restoring in the world? To be honest, I have no idea…. But it IS restoring in the lockpick world as LockCon looks to happening this year!! \o/
After a mandatory pause, we are looking forward to again discuss all the things locks in a castle in the city of Baarlo. LockCon will be held from Thursday 25th of August to Sunday 28th of August.
Want to join? Maybe want to give a talk? Workshop? Host a competition? Sponsor us? Fill in your details here (link no longer active 20-08-2022) and we will get back to you. (Regular attendees, please check your email.)
This is a proof of concept for a manipulation method for the RKS. At least a passing familiarity with safe combination lock manipulation is assumed.
As far as I know this is the first public manipulation for the RKS – or at least it was when I did the actual manipulation some months before writing this post. Please do let me know if you know of others before me.
editors note: Pics or it didn’t happen, no hearsay allowed. 🙂
RKS operating principle
I’ll provide a quick rundown of how the RKS lock works, but I’d suggest reading Han Fey’s excellent writeup for more in-depth information. Note that there are some differences between what’s detailed in the doc versus the lock I have, but the general idea is the same.
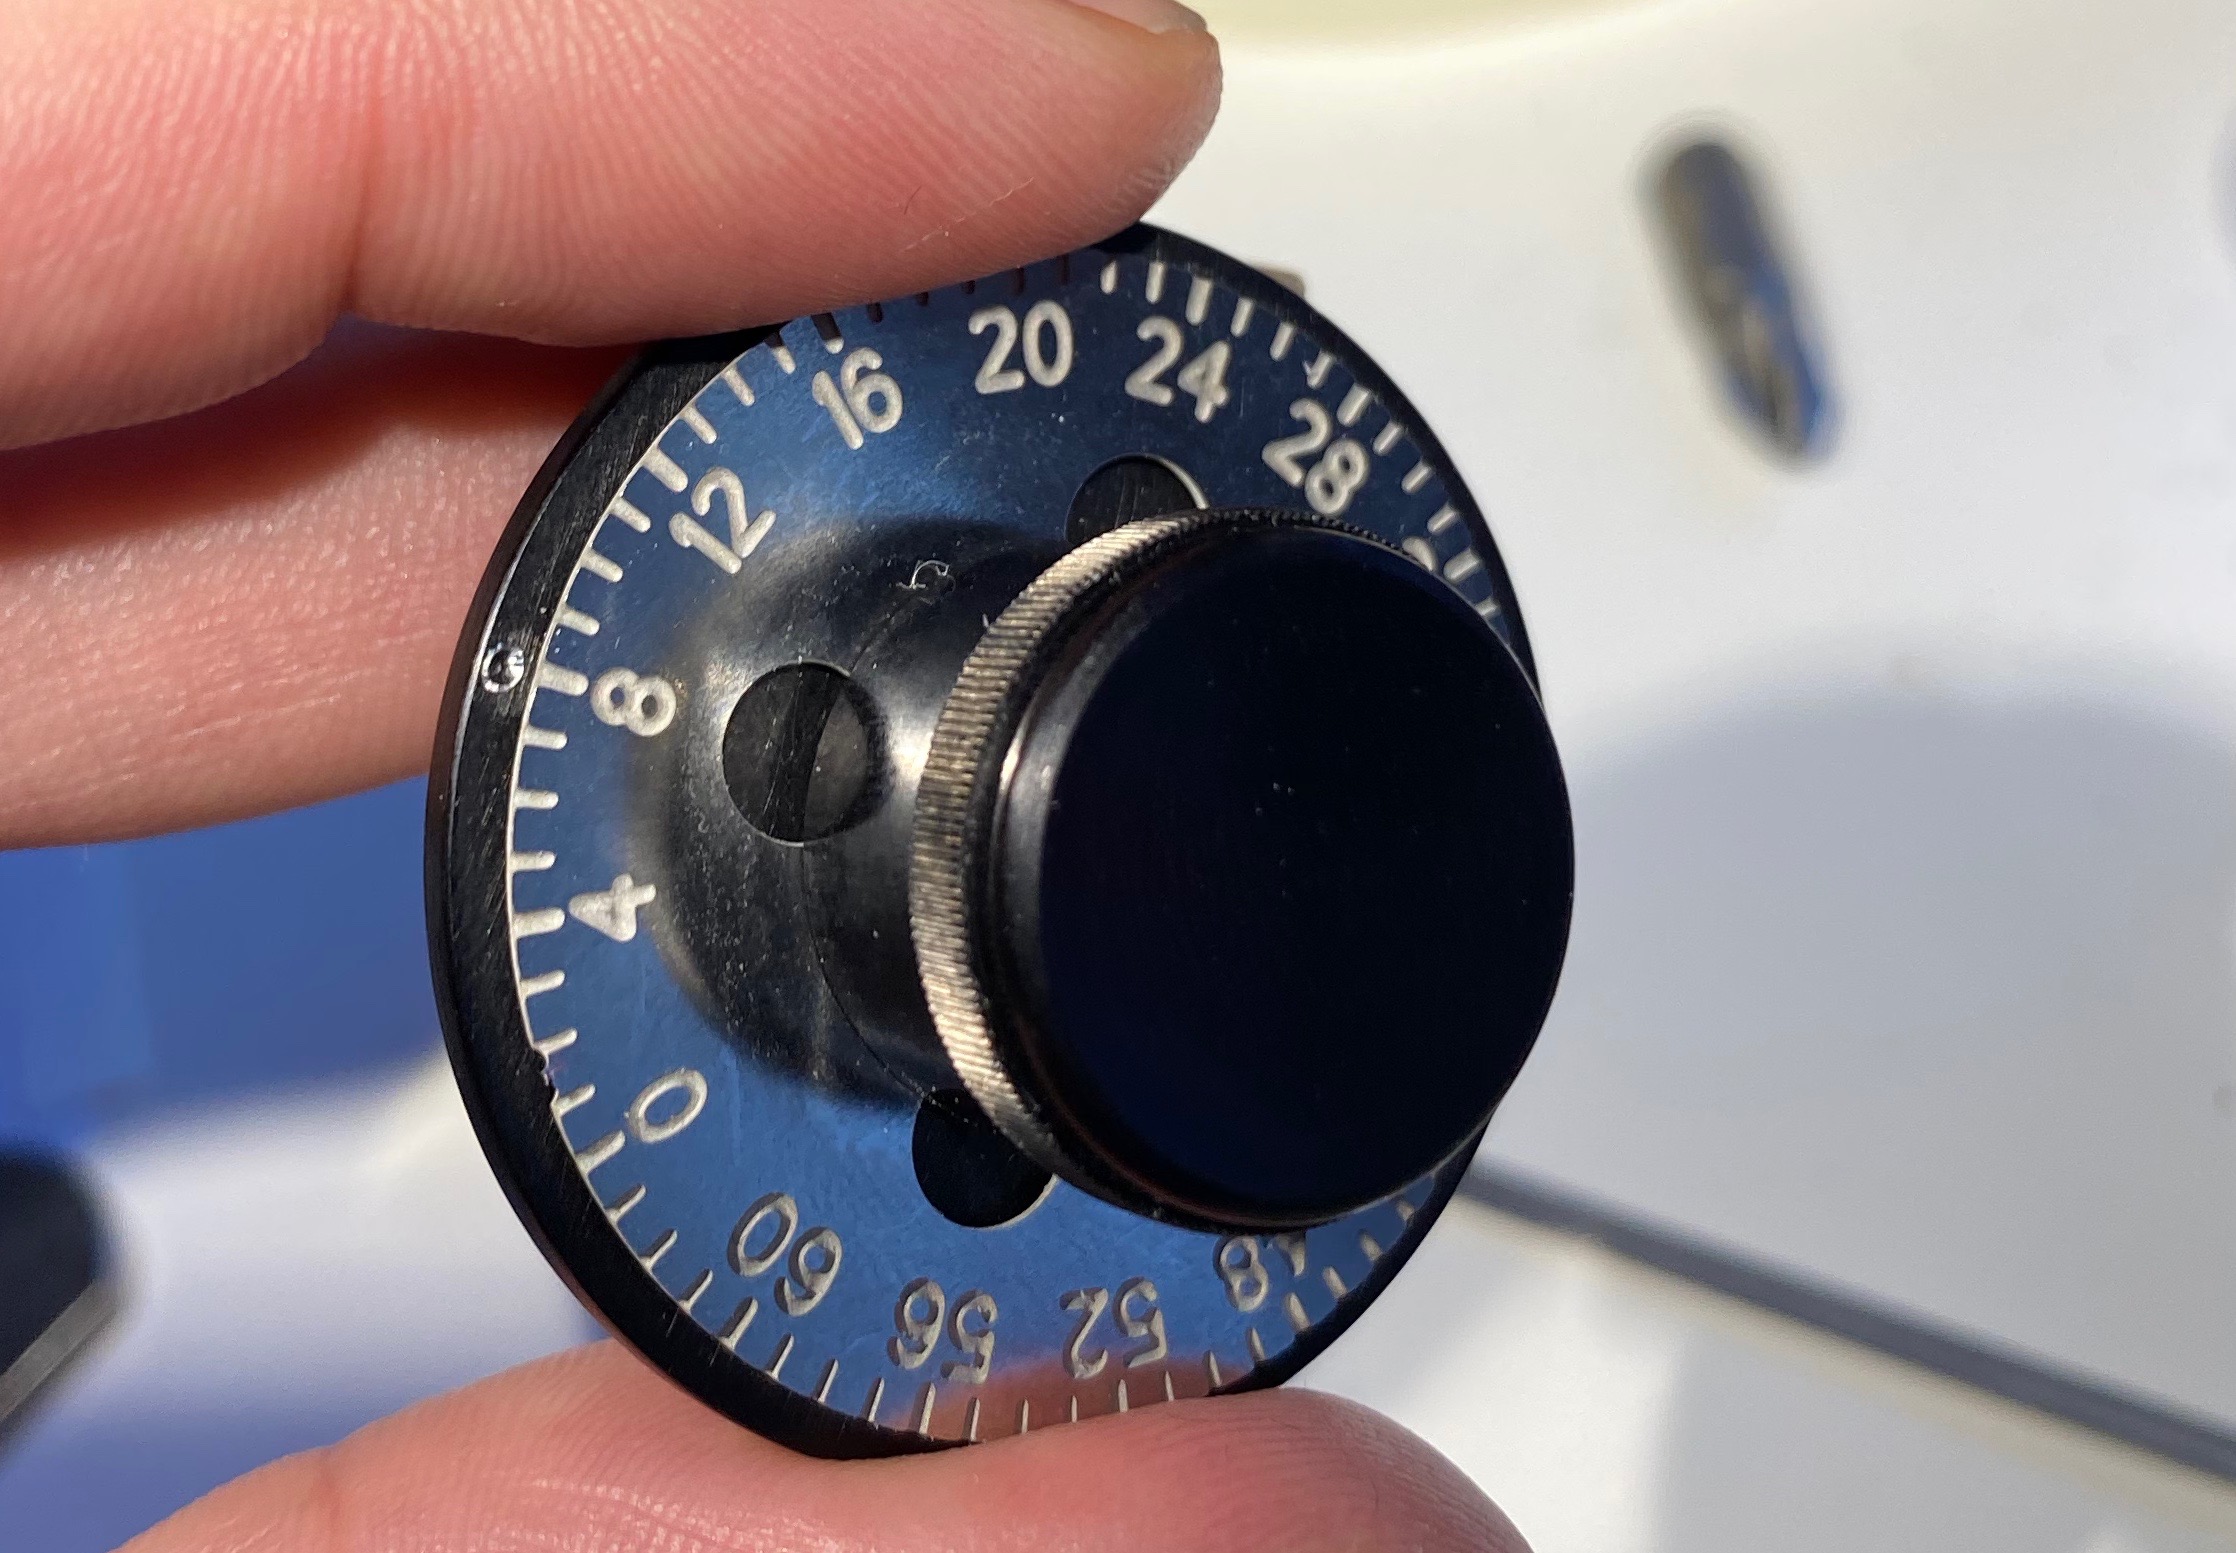
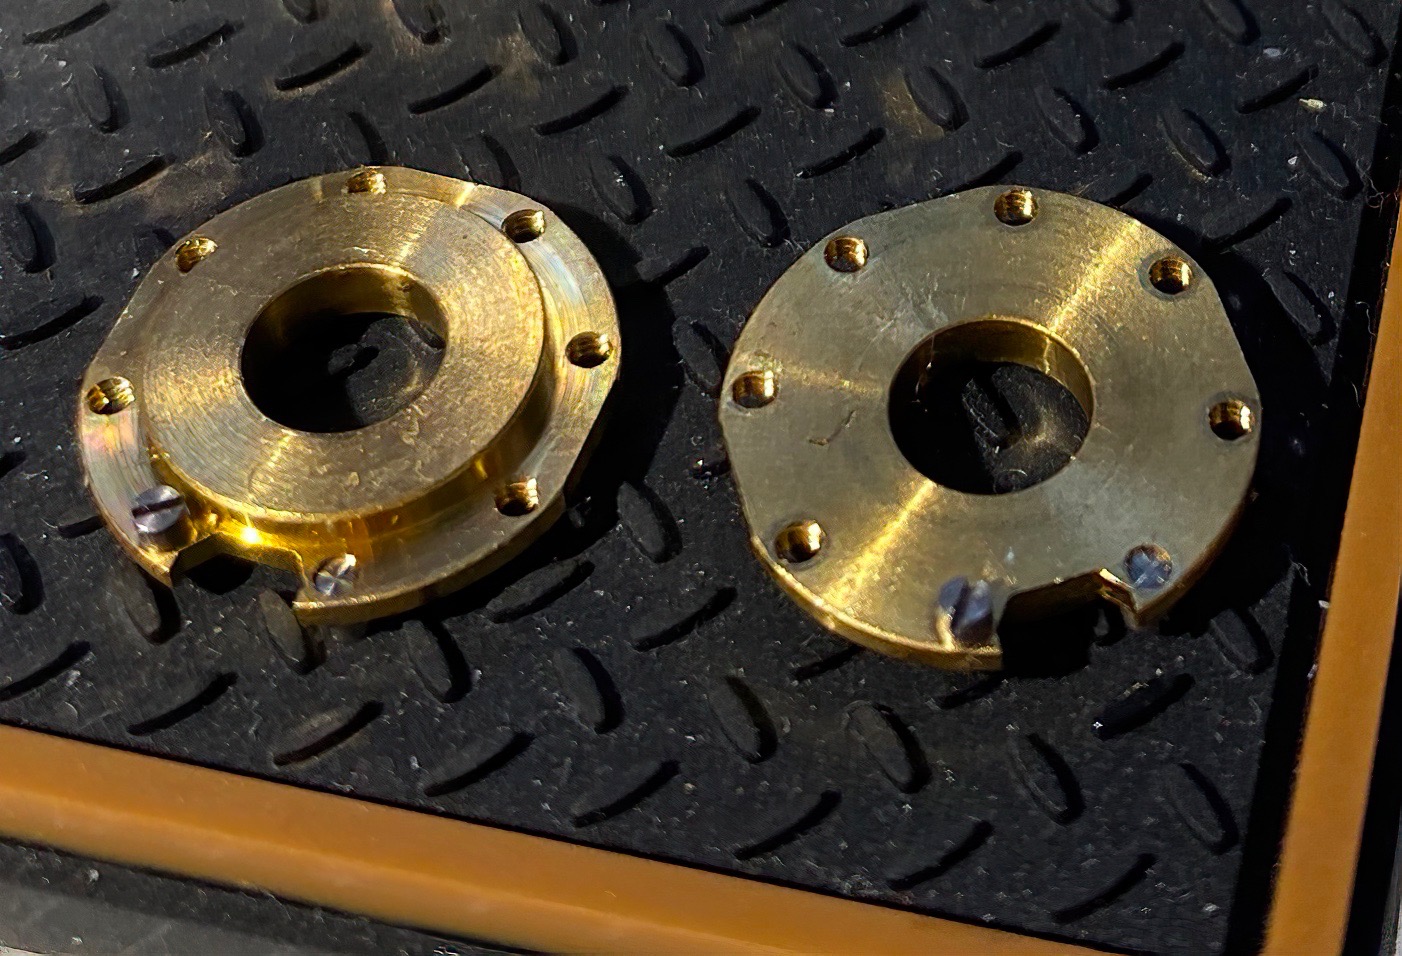
The RKS cam lock innards resemble a hybrid of a fixed drive pin combination lock and a disk detainer lock. Like both disk detainers and combination locks, it has several disks with gates on them (ie. wheels in combination lock terms, but the RKS doc uses “disk” so I’ve stuck to the same terminology) – 5 in my version – and a drive disk which is equivalent to the cam. Like in combination locks, the gates can use the full 360° of the disk. Each disk including the drive disk has multiple false gates in addition to the true gate, but they’re equally spaced. Like in a disk detainer cam lock, the plug is prevented from rotating by a sidebar that fits into the gates on the disks. The combination is changed by changing the position of a drive pin on the edge of each disk, similarly to screw change combination locks although it seemed like only the “bottom” or dialer side pin is changeable – or possibly the ones I tried were just very tight, but I didn’t want to force them considering how tiny the screws are.
The drive disk is at the “far” or cam end of the lock, and it’s driven by a drive shaft that goes through the disk pack and is connected to a detachable dialer, either manual (which I have) or electronic. In effect this gives us a 5 wheel combination lock with each number in the combination between 0 – 63 which is opened like a fixed drive pin lock: you always track the previous number, so if the combination starts L30 R7 L28 … you need to pass L30 5 times (ie stop on the 6th), then dialing R7 you need to pass 30 4 times before stopping on R7, then going to L28 you need to pass 7 three times etc etc. After you’ve dialed the combination you apply counterclockwise tension to the edge of the dialer to rotate the plug itself (ie you don’t rotate the “dialing part” of the dial so the drive disk doesn’t move), which then forces the sidebar to slide down into the gates and allows the plug to rotate.
Note: I’ll use the same numbering scheme for the disks as with combination locks, so disk 1 (abbreviated to d1) is the one closest to the dialer and disk 5 (d5) the one furthest away from it, right next to the drive disk.
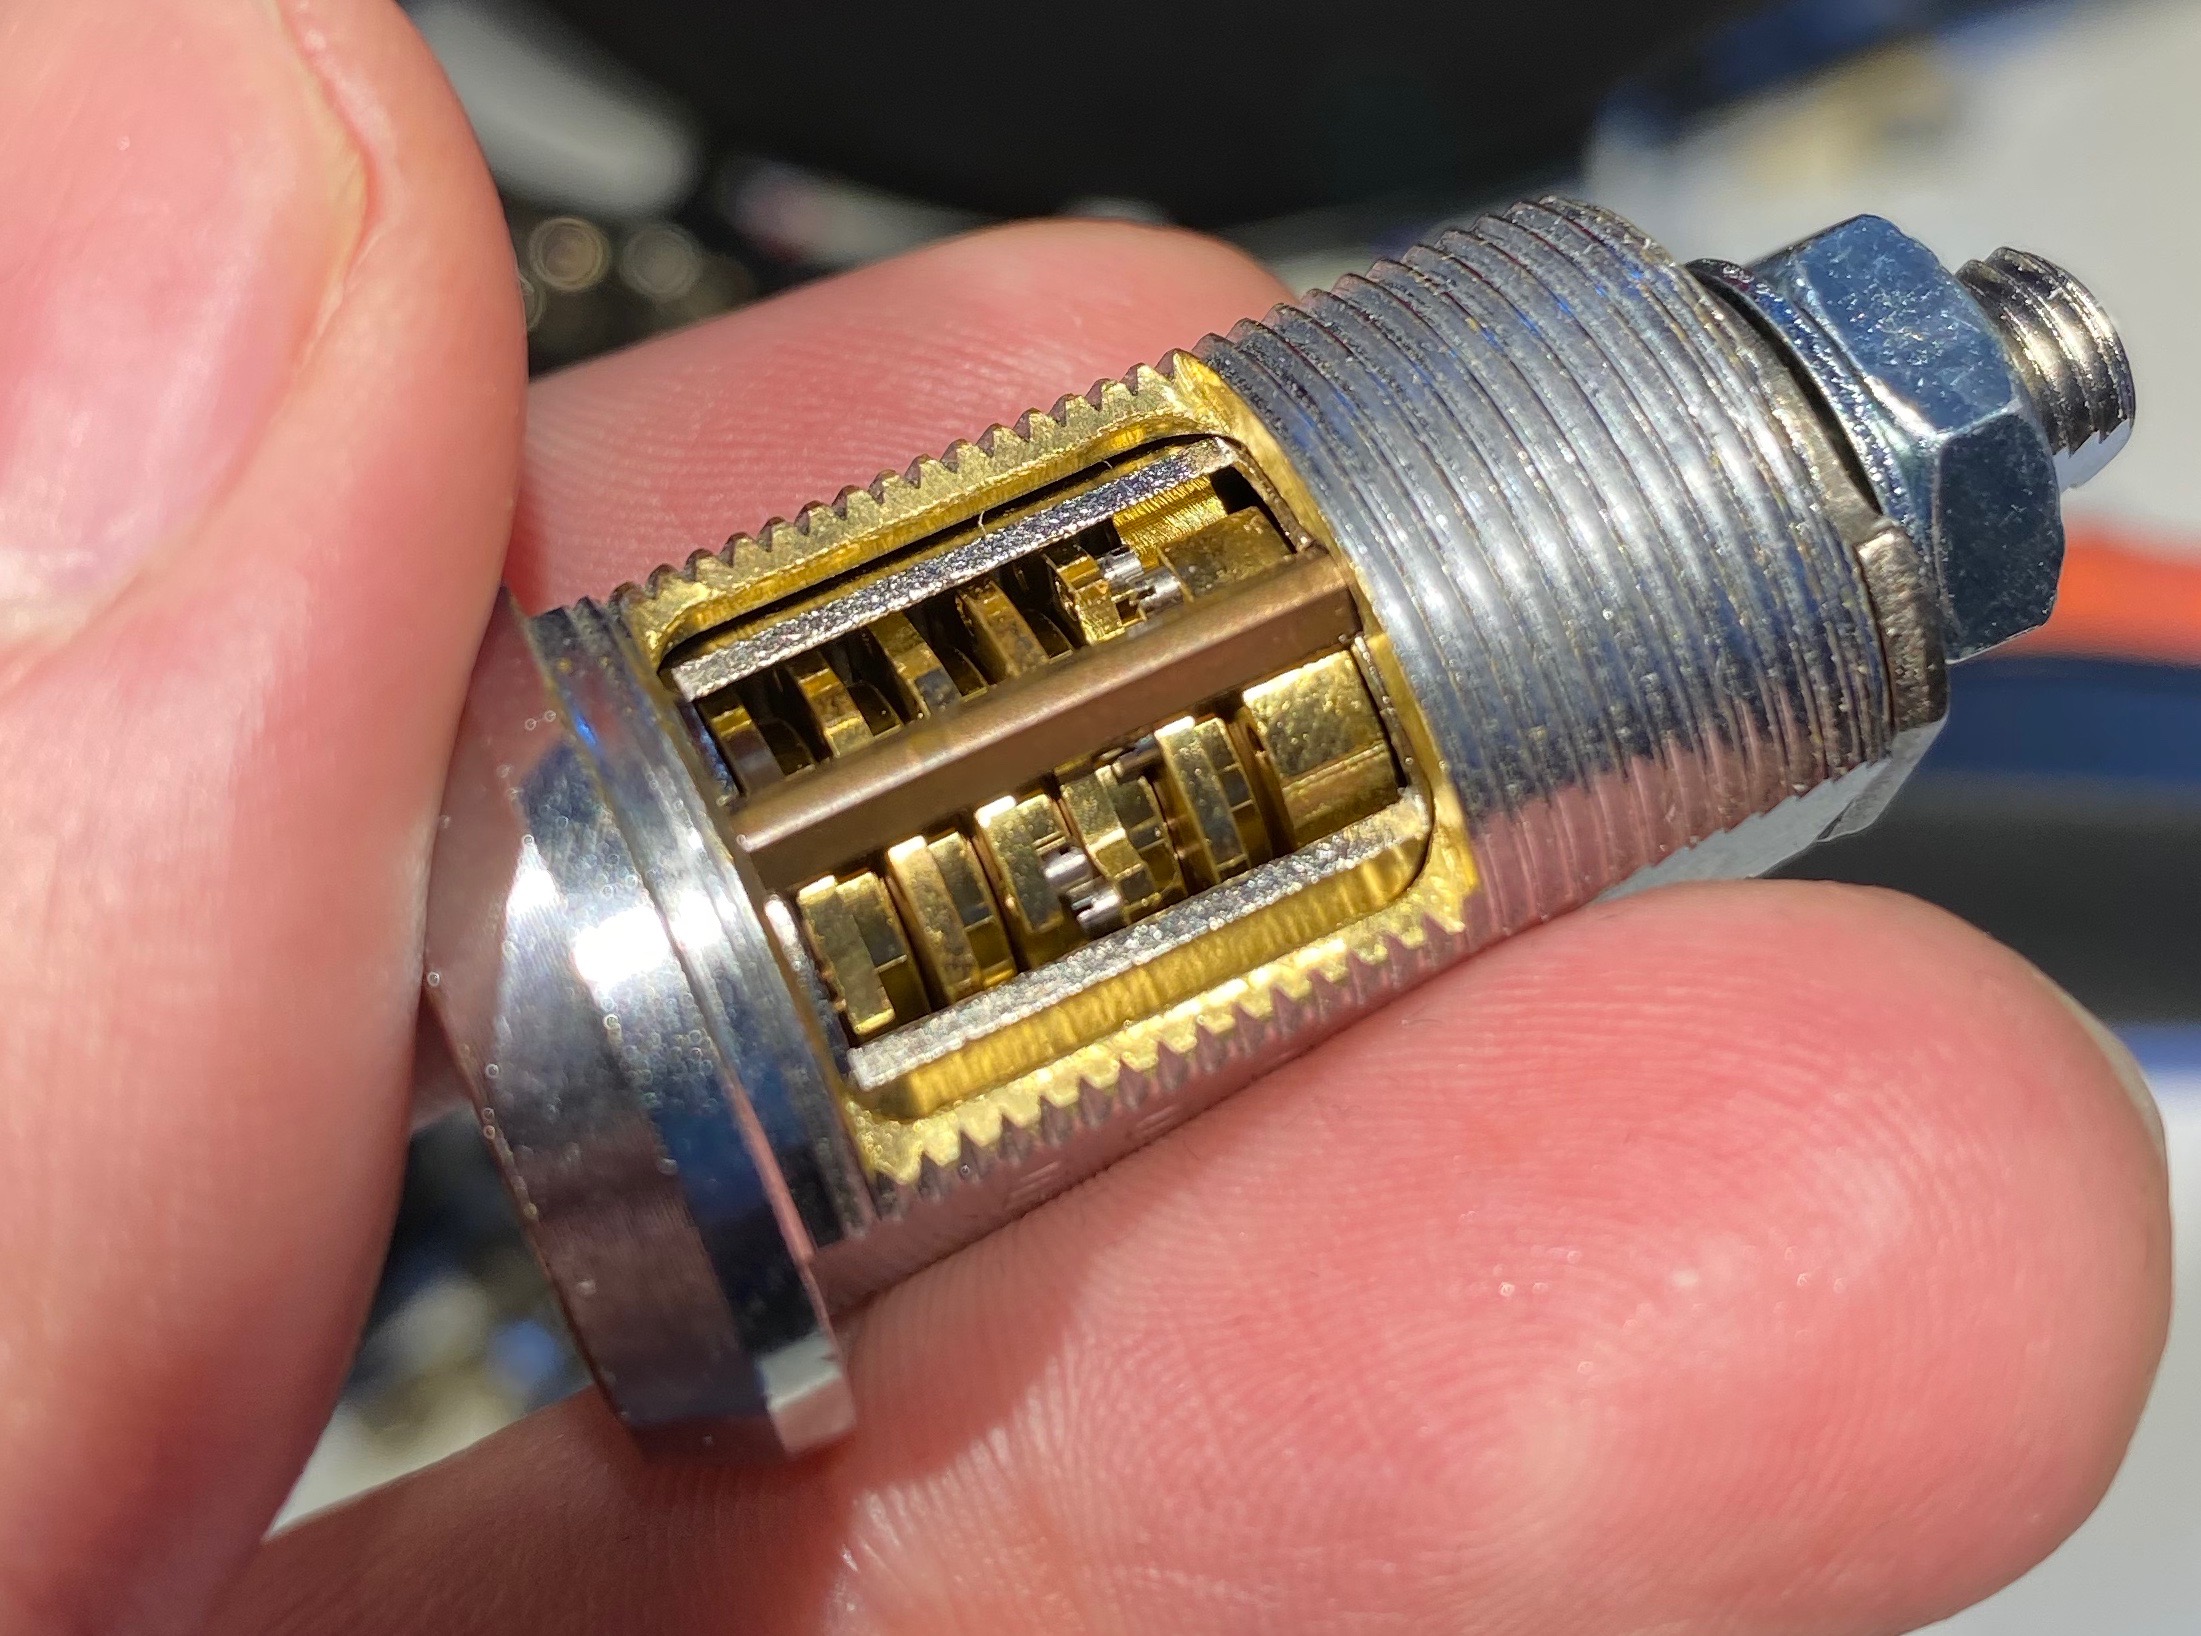
The cutaway lock, sidebar and disks visible. The drive disk is the one on the right, followed by d5, then d4 etc.
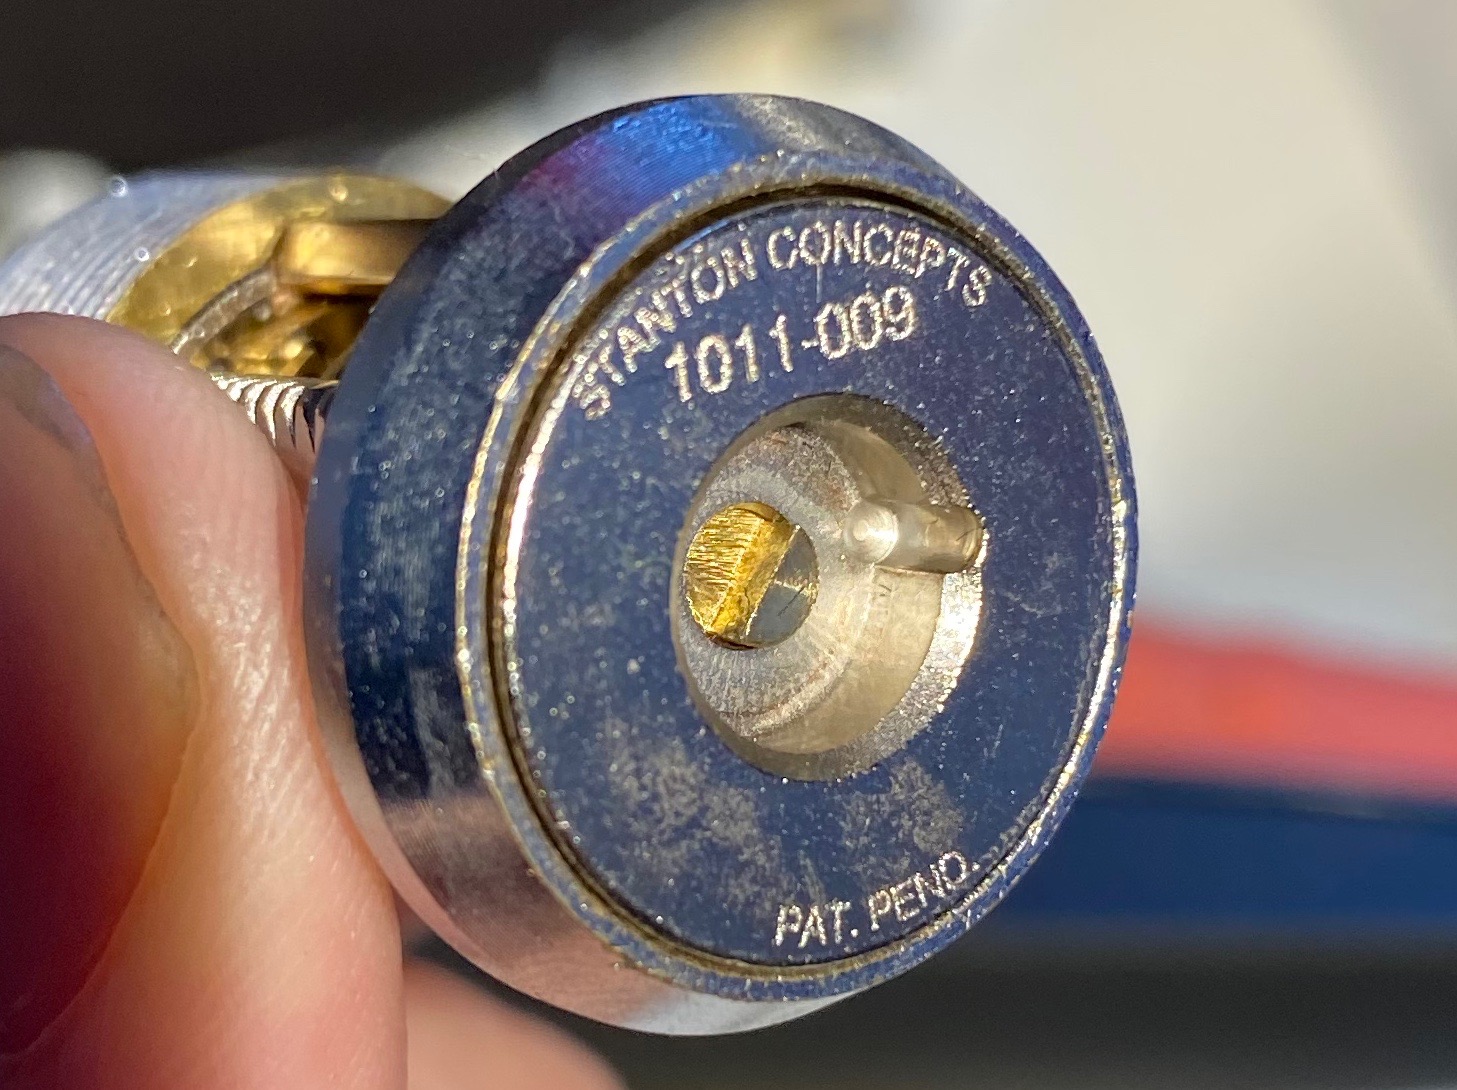
View of the “keyway”
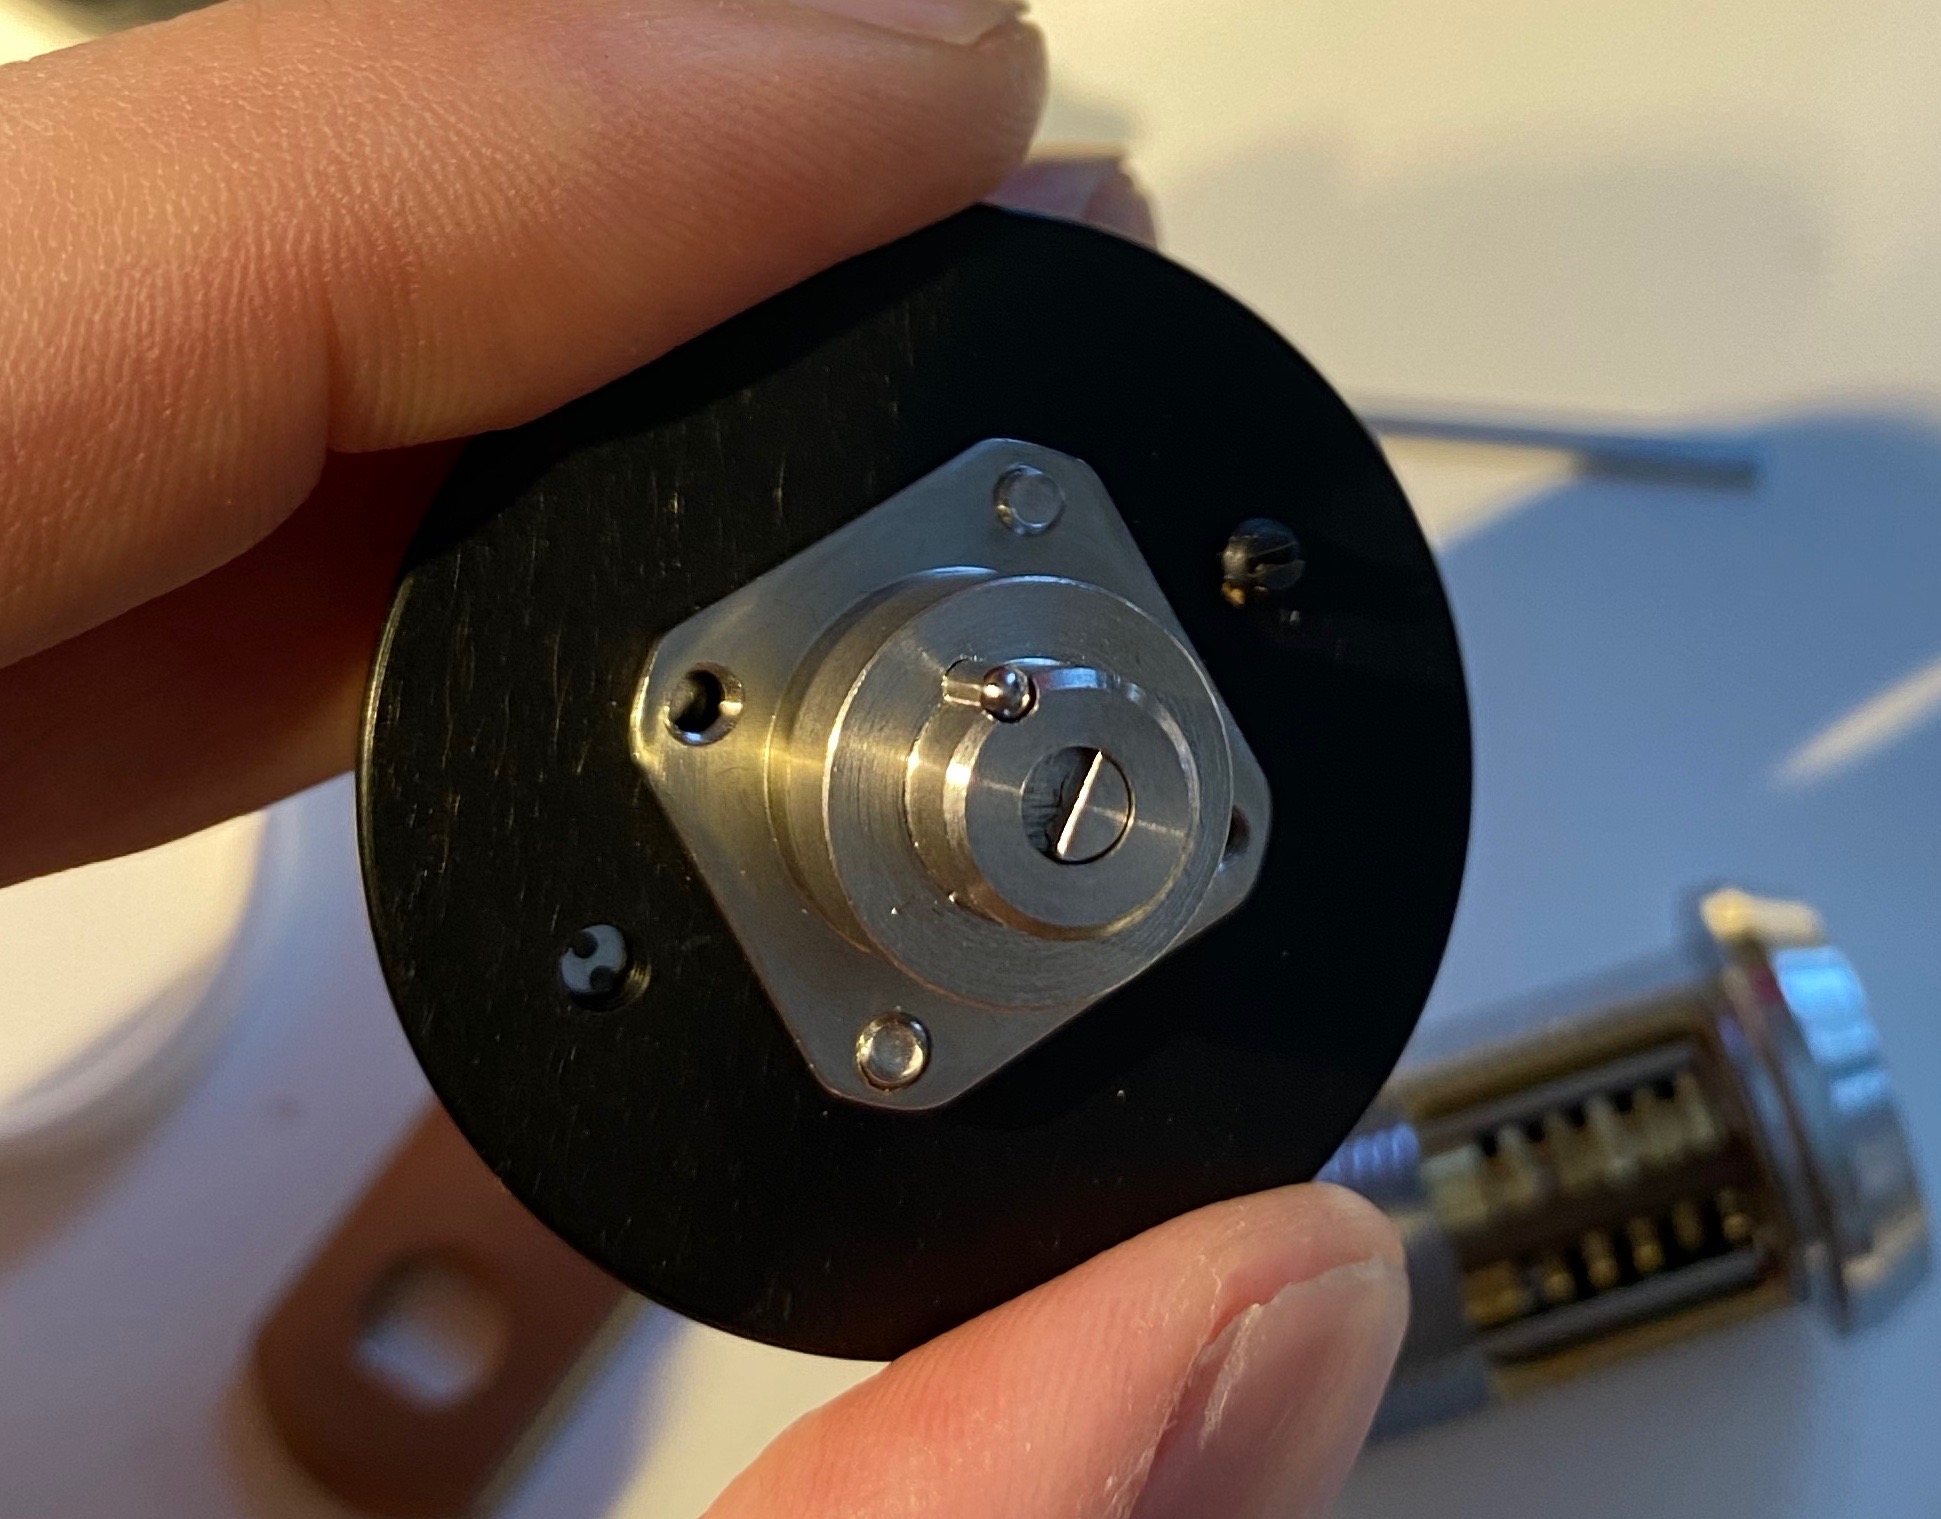
Manual dialer. The dial itself is rotated with the knob, and torquing the body / edge (the black part) of the dialer counterclockwise is used to actually open the lock
Manual dialer, underside. The black screw visible on the right side of the body of the dialer makes it click to increments when dialing
Measurements
number range 0 – 63, meaning 5.625° per increment
5 disks and a drive disk
4 gates per disk (including drive), 3 of which false at 16 increments or 90° apart
8 drive pin holes per disk, at both edges of each gate
gates are ~5 (28°) increments wide, including the drive disk. Measured by looking at the cutaway from the top and moving the edge of the sidebar from one side of a gate to another
gate binding (or, rather, lack thereof) can be felt for ~6 increments
drive pin width is ~2 increments, 11.25°
sidebar ~2.2mm
Top and under side of disks with default “0” pinning. Each disk’s three false gates are a bit poorly visible in this picture, but all gates are 90° from each other.
Figuring out a manipulation method
To even get started I had to slightly modify the dialer; normally it clicks in place to number increments, but that would stop me from getting useful feedback. I removed the screw that does this, meaning I got a free-spinning dial. Unfortunately that made accurate dialing very hard since the dial moves if you so much as look at it wrong.
My initial thought was to approach the RKS like a DD lock; I first turned all disks left or counterclockwise (“ADL”, i.e. same as AWL or all wheels left for regular combination locks) to L0, then started to apply tension while turning the dial to the right, feeling for gates on d5 passing under the sidebar. However, this method has some fairly obvious problems. First of all, you get feedback from the gates (false or otherwise) of every disk that’s rotating, including the drive disk. Even on d5 you’ve got the drive disk gates and d5’s own gates in play, and it only gets worse the further down the disk pack you go. I did feel the gates (true & false) on d5, and while I thought I could distinguish false ones from the true but that seems to have just been confirmation bias.
Like with safe combination locks, some disks are also “shadowed” by others due to manufacturing tolerances, meaning that a very slightly bigger disk (or one that sits slightly higher on the drive shaft) will block feedback from smaller disks. This means that simply turning all disks in one direction won’t necessarily give you the gate positions on all disks.
So, obviously this wasn’t a viable manipulation method, at least by itself.
“Well, it’s sort of like a safe lock?”
Maybe I should have approached it more like a safe lock?
My reasoning was that when there’s a gate under the sidebar, applying tension with the drive disk gate (think “cam gate”) also under the sidebar should allow the sidebar to descend slightly lower than otherwise, meaning I should be able to measure the width of the area where the sidebar doesn’t bind near the drive disk gate when I apply torque to the dialer’s edges to make the sidebar drop down – this is the RKS’s equivalent of the contact area and contact points you deal with on safe combination locks.
Unsurprisingly this method turned out to be the proverbial ticket, but to actually get good results I had to refine it. I had problems with consistent torque when tensioning, poor choice of initial disk positions when starting graphs, slop / play in the dial, and the sheer amount of dialing that would have to be done unless I cut down on the number of measurements I had to do.
Tensioning
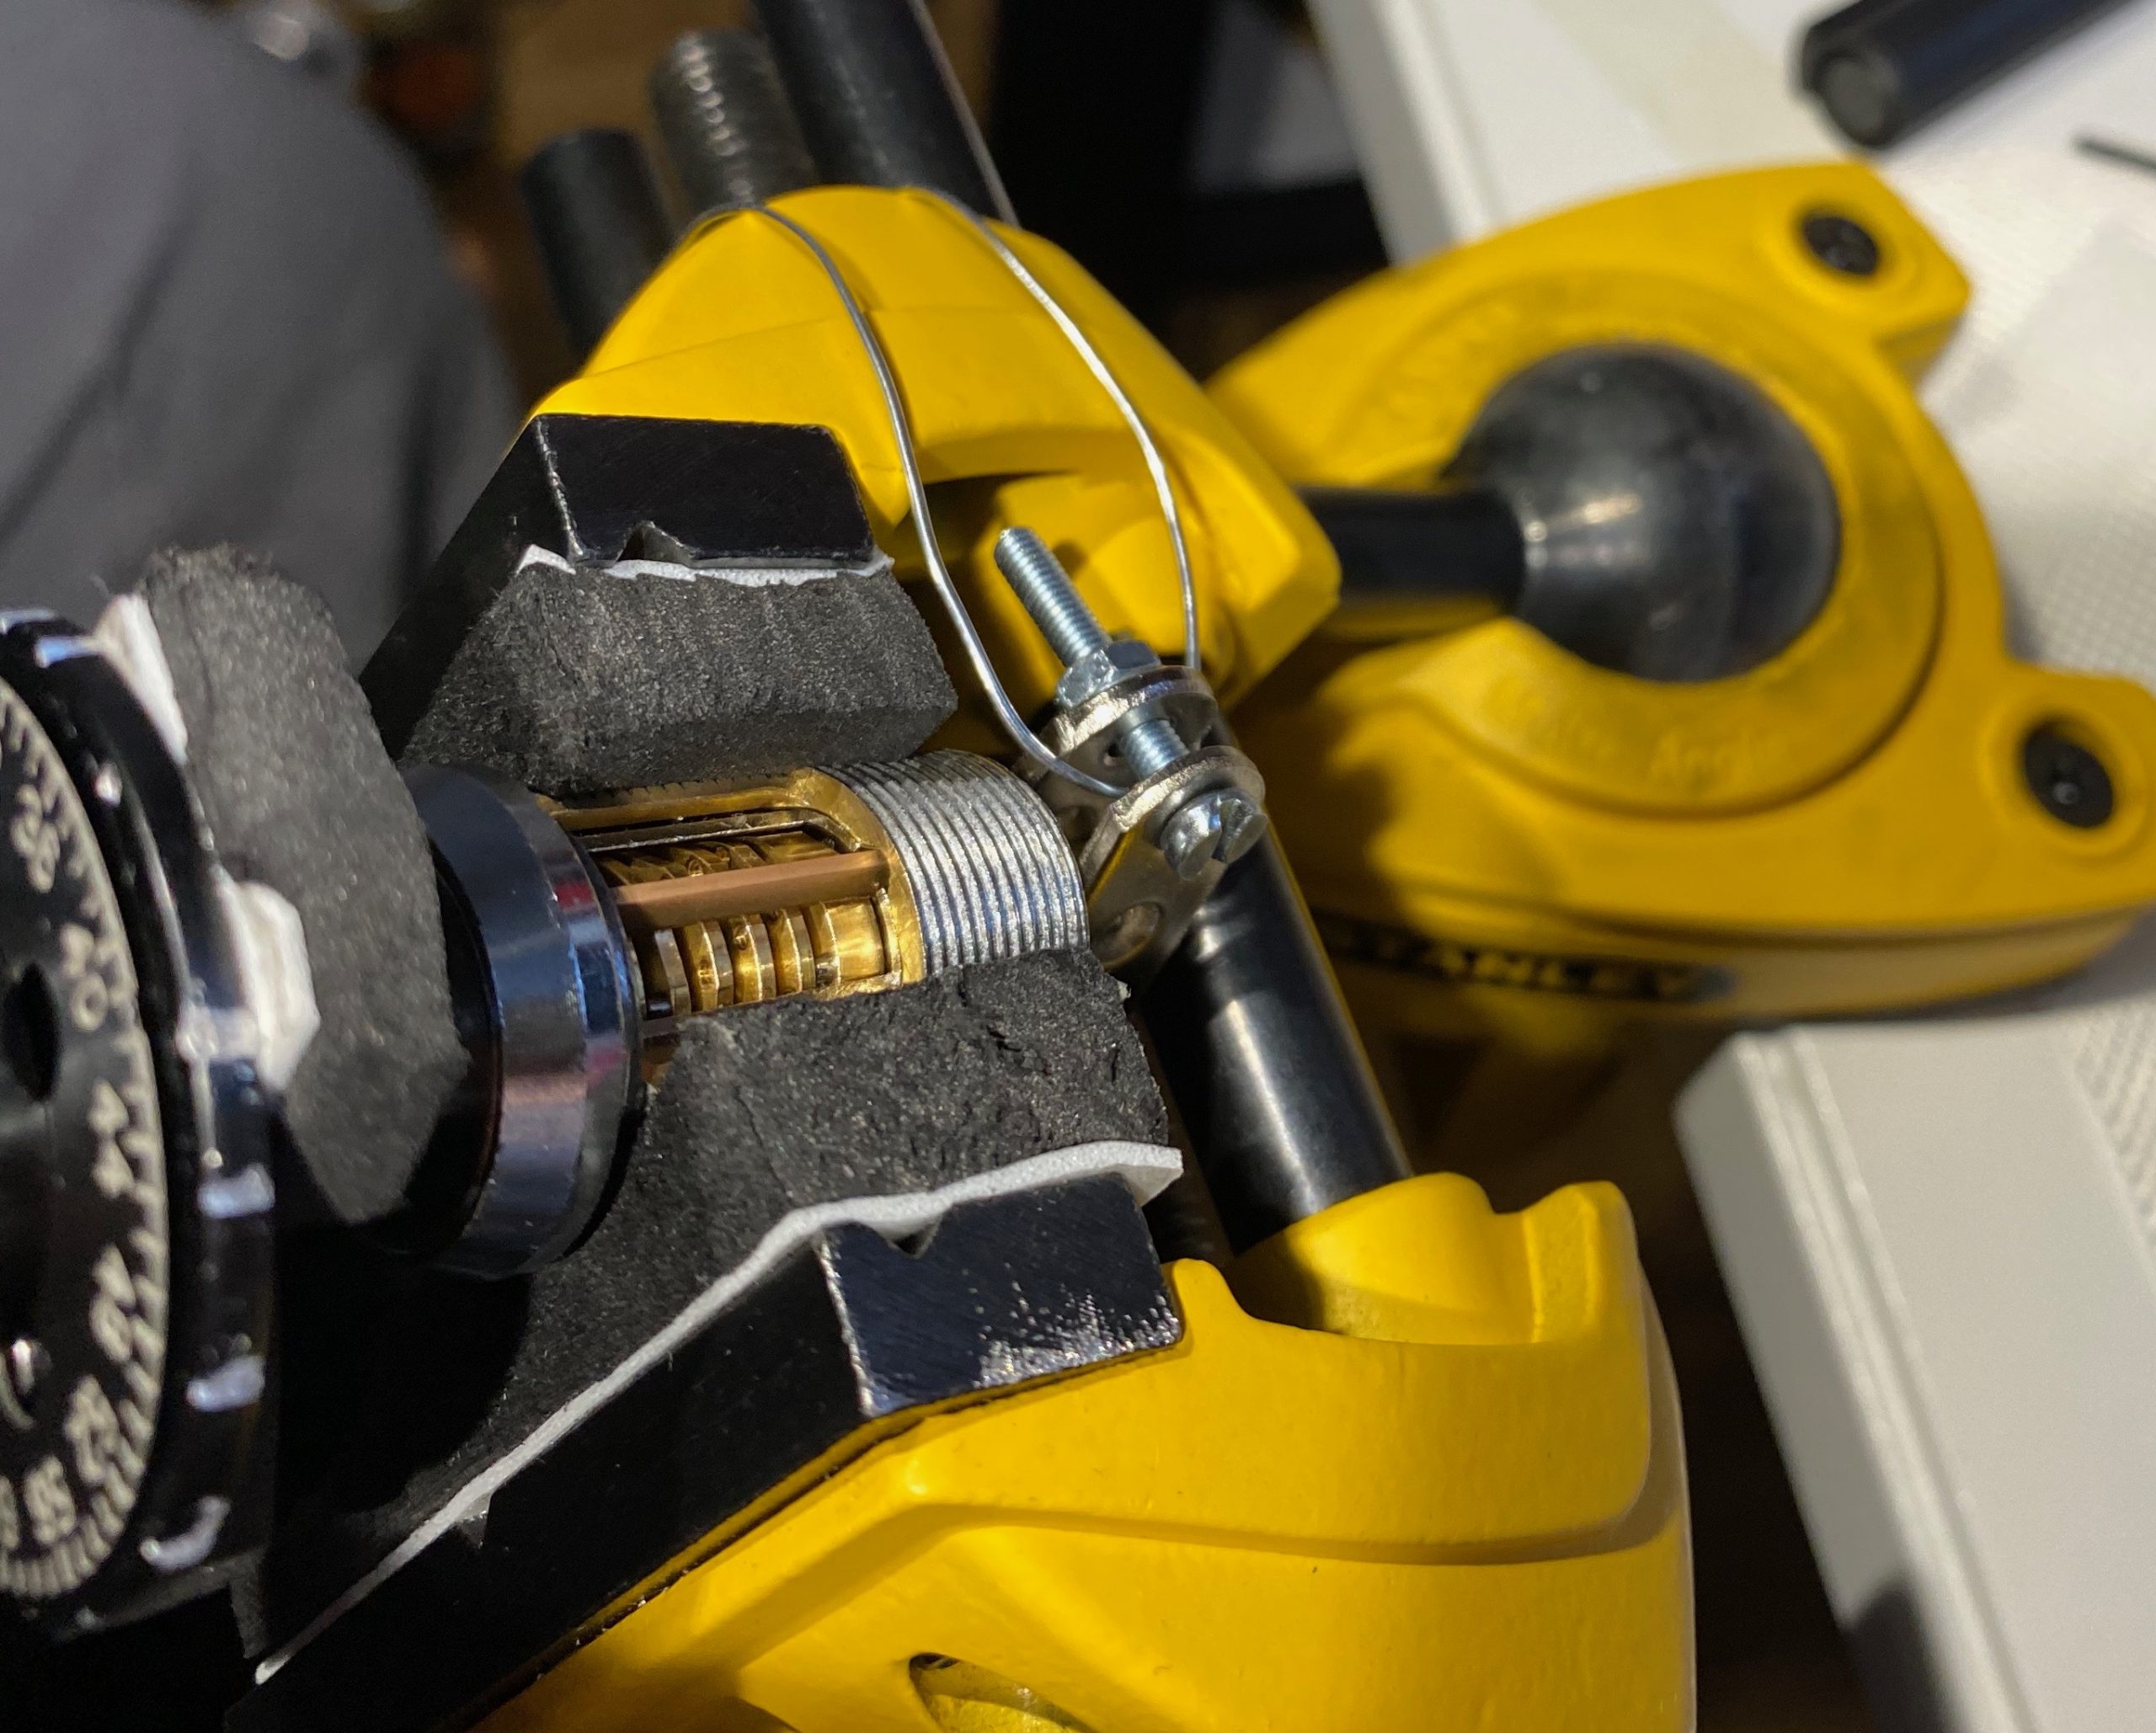
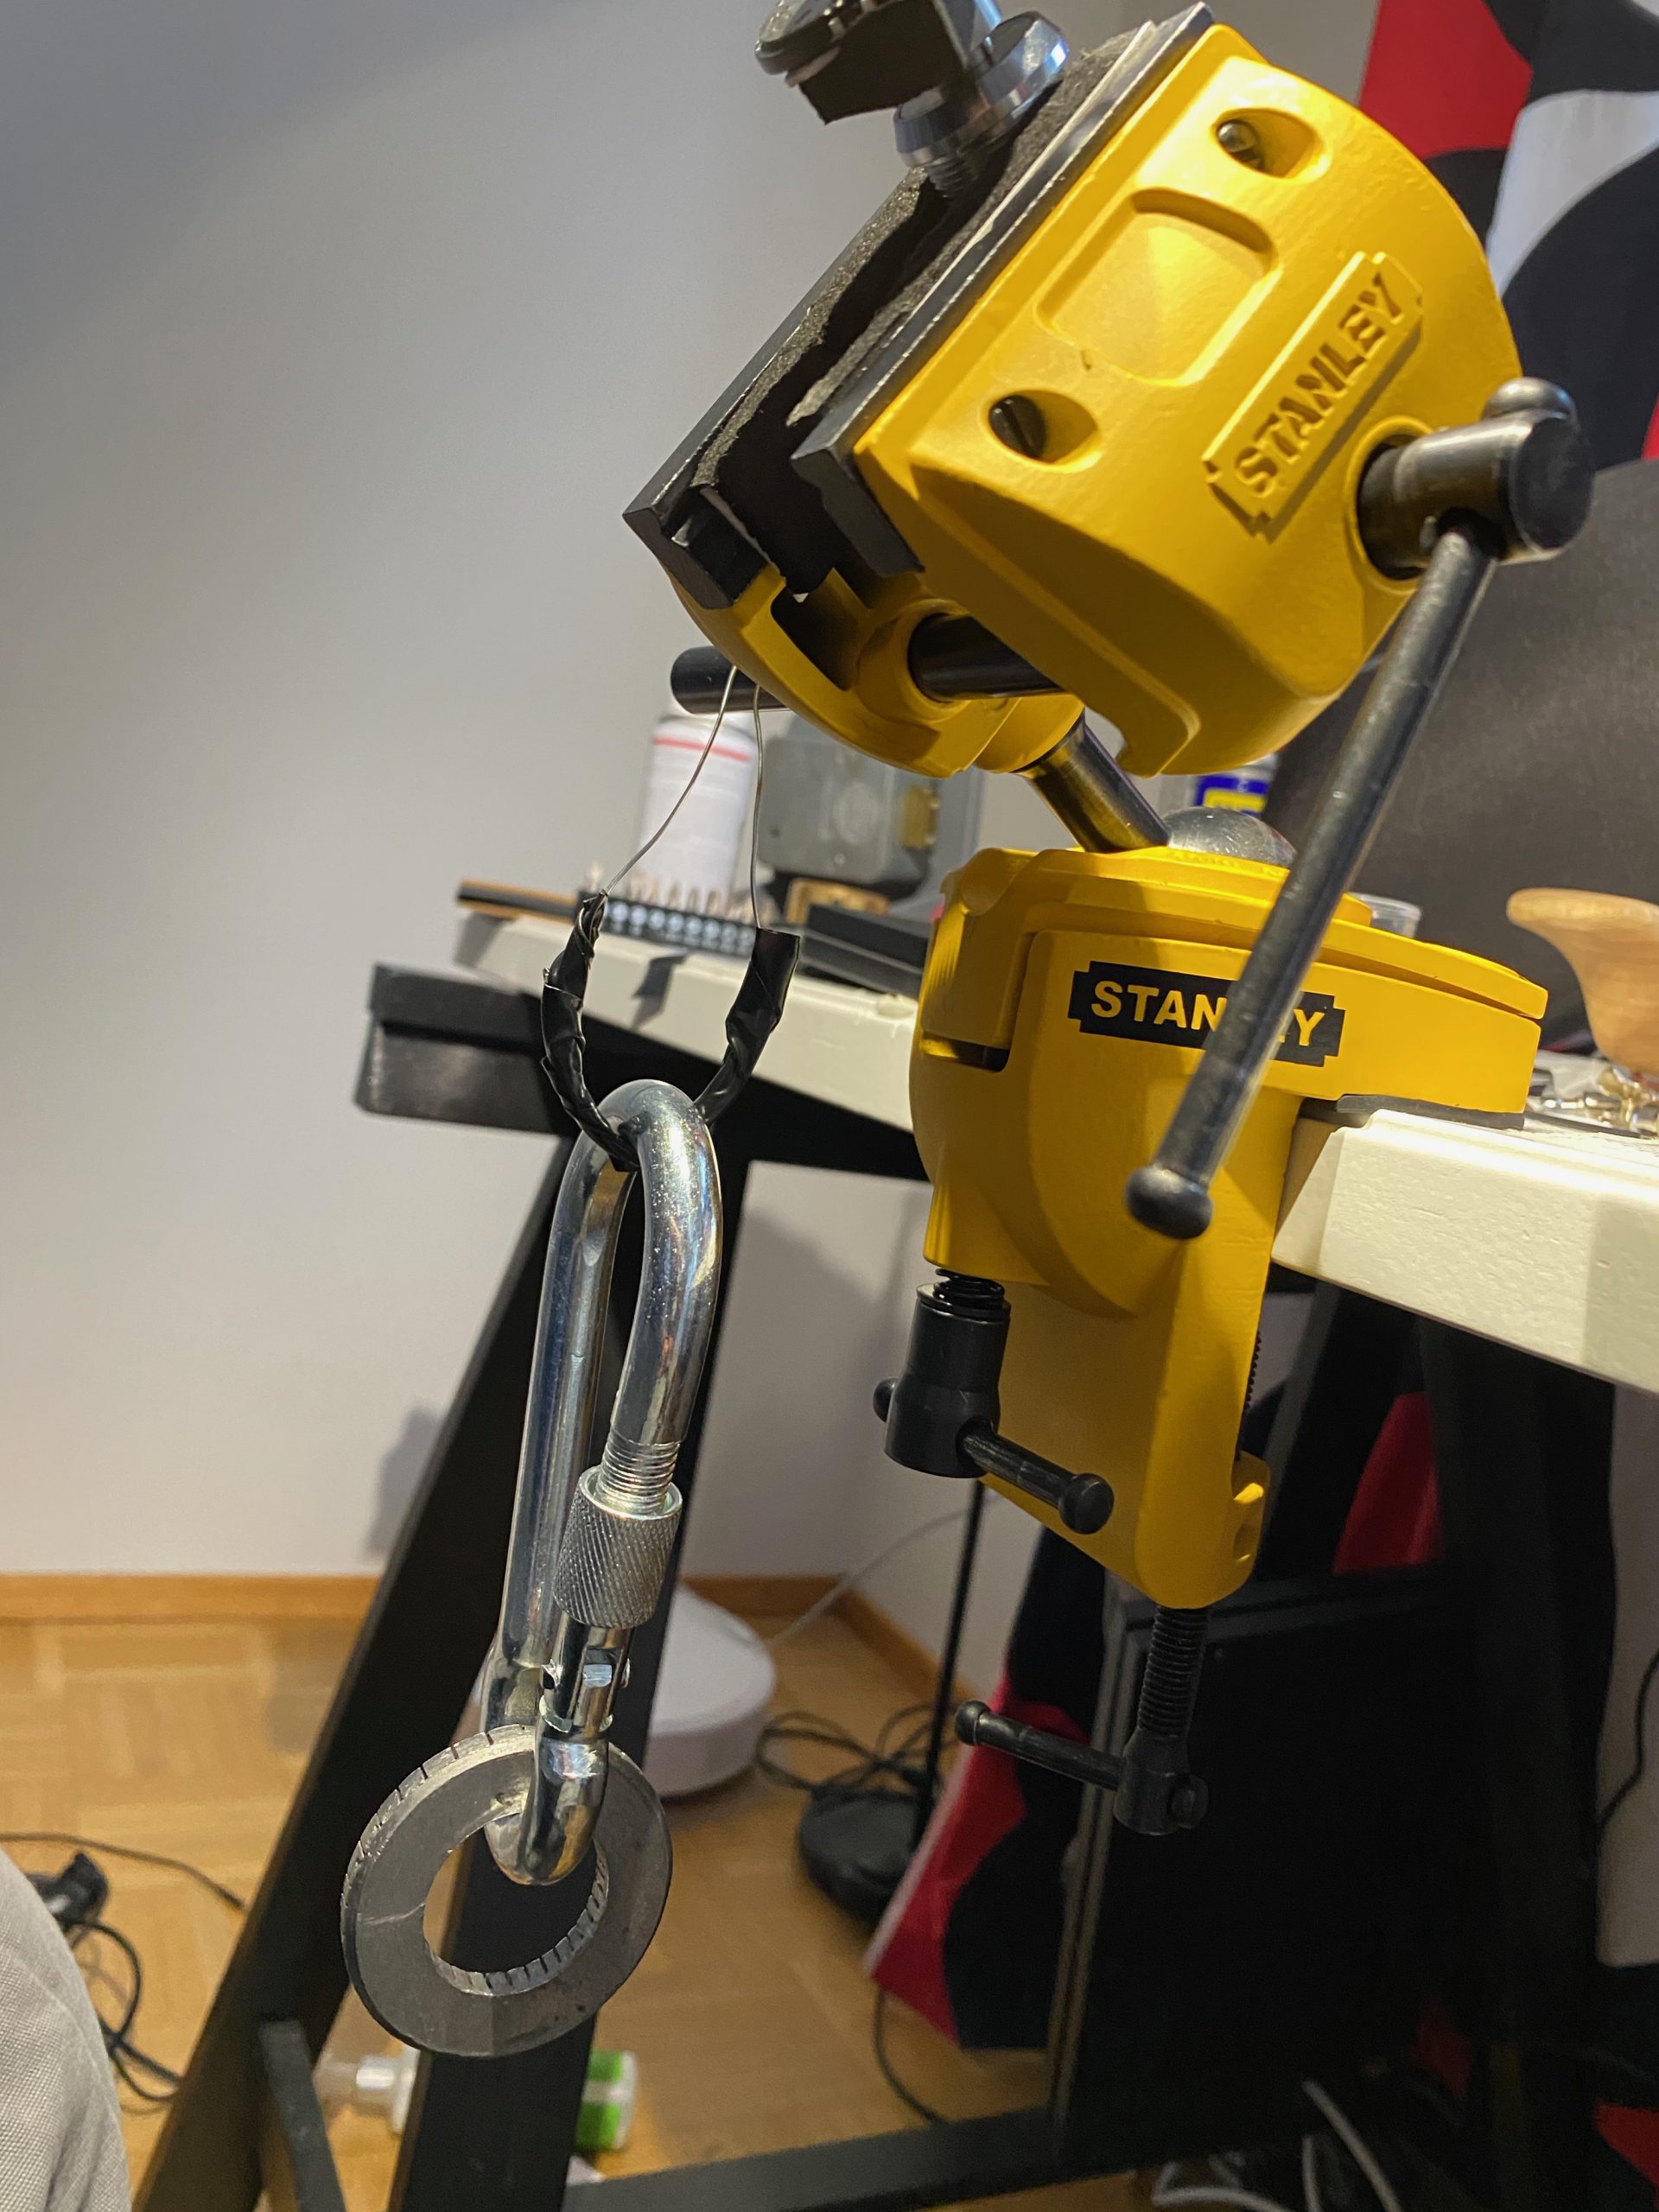
Getting consistent readings was hard since I was tensioning using my fingers – the torque I was applying was variable, which meant that the sidebar lowered different amounts every time I took measurements. So to even get started I needed to come up with a way to provide consistent torque when tensioning, and I experimented with a few different methods. Since this is a proof of concept I eventually gave up and ended up cheating a bit and tensioning by hanging some weight from the cam itself, but something similar-ish should be doable on the dialer side albeit with more work.
Tensioner attachment on the cam.
Tensioner weight (and yes that’s a Manifoil lead shield)
Initial disk positions
I started my first graphs with ADL. However I soon realized why this is a bad idea.
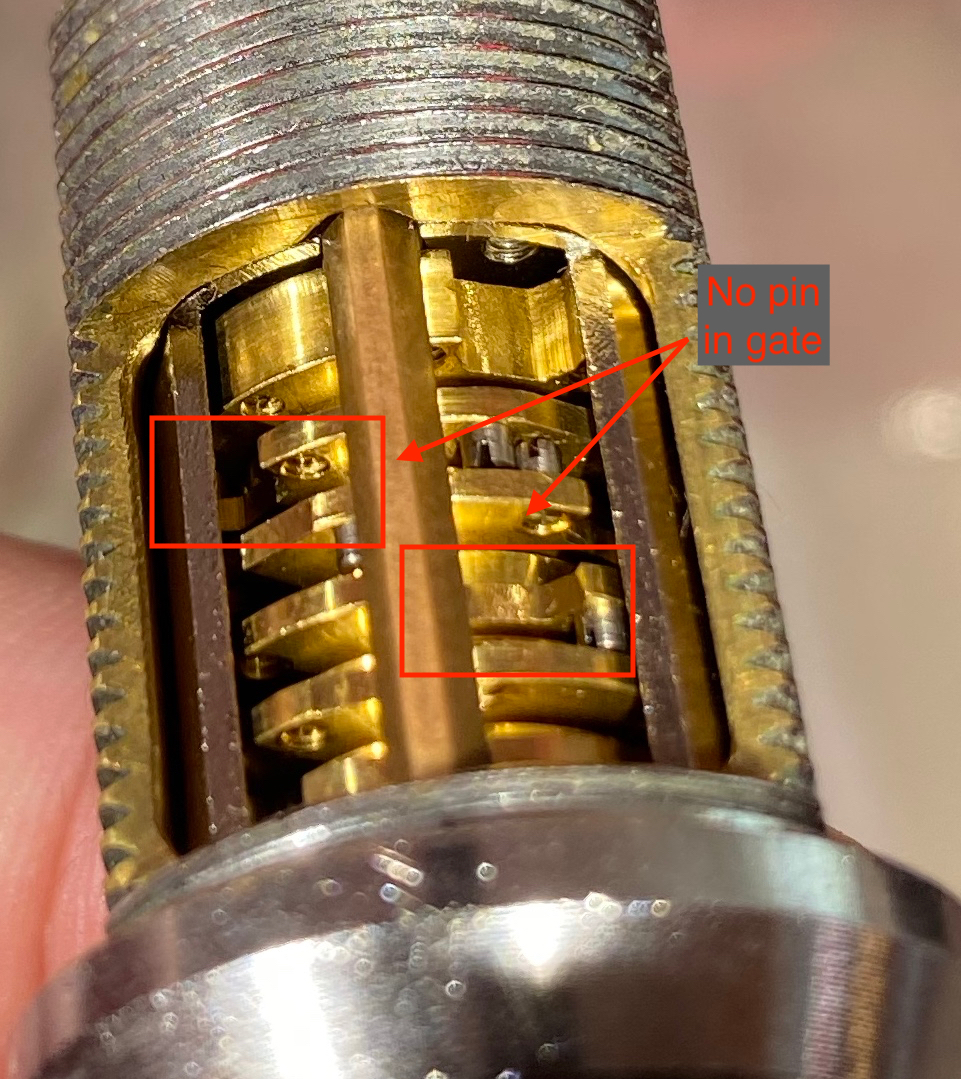
When going ADL, the drive pin of the previous disk ends up in the gate, meaning that it blocks the sidebar from descending and therefore gives you much narrower and shallower gate signatures.
Going ADR leaves the gates open.
Dialing
Dialing with a modified free-spinning manual dialer is extremely fiddly and liable to drive you insane, and since there’s 5 disks the amount of dialing that would have to be done with a “naïve” approach would be ridiculous.
However, the fact that gates are always 90° apart can be exploited to radically cut down on the amount of dialing. This means that when you find one position where the drive disk doesn’t bind, you know that the other gates are n * 16 increments (1 <= n <= 3) apart from it. Since gates can be felt over about 6 increments, you can then map out the edges of one gate and therefore figure out the edges of all gates.
Also, as I went along it turned out that I was getting indications in order starting from d5; my assumption is that this was due to the fact that I was tensioning the lock from the rear which meant that the sidebar would be at a very slight angle so that it’s lower on the d5 end and higher on the d1 end. After some playing around I noted the same phenomenon but reversed if I tensioned using the dialer (like it would “really” be done), so d1 would read first, then d2 and so on. This meant that once you successfully find the position of a disk’s gate you can figure out how many increments from that position the next disk’s gate will be at a minimum, and start your next graph from that position so you wouldn’t waste time graphing a spot where it’s impossible to have a gate. You can do this by using the fact that there’s a fixed amount of drive pin positions; when going right the minimum distance is - (pin distance + pin width * 2) , and left is pin distance - pin width, both modulo 64 (proof is left as an exercise to the reader).
Graphs
Graphs for this method end up looking slightly different from safe combination locks since a lot of the time you’re not actually getting any binding on the drive disk due to shadowing, so for some indices you can’t get any contact point readings.
I generally kept the cutaway “window” covered, but since this was a proof of concept I occasionally peeked to verify theories or make sure I dialed a number right.
I’ll showcase the graphs for the first 3 disks here since they’re the most interesting.
ADL
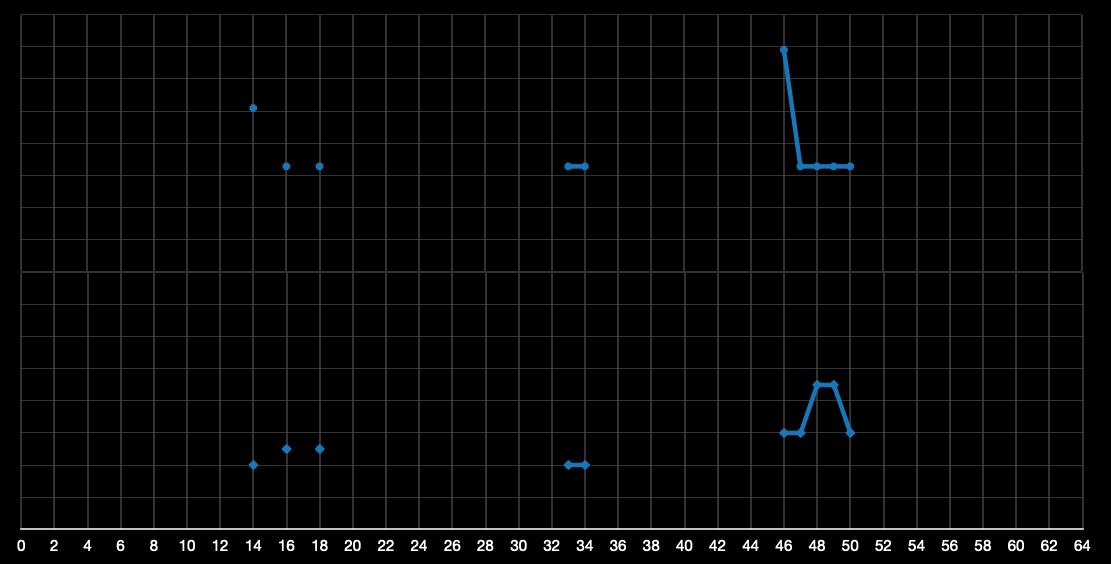
As I said, I started off with ADL before realizing it’s a bad idea. This is what the first graph where I used the tensioning tool but with ADL looked like (left contact on the bottom):
So I found the gates, but I couldn’t tell the true gate apart from the false ones.
First ADR, disk 5
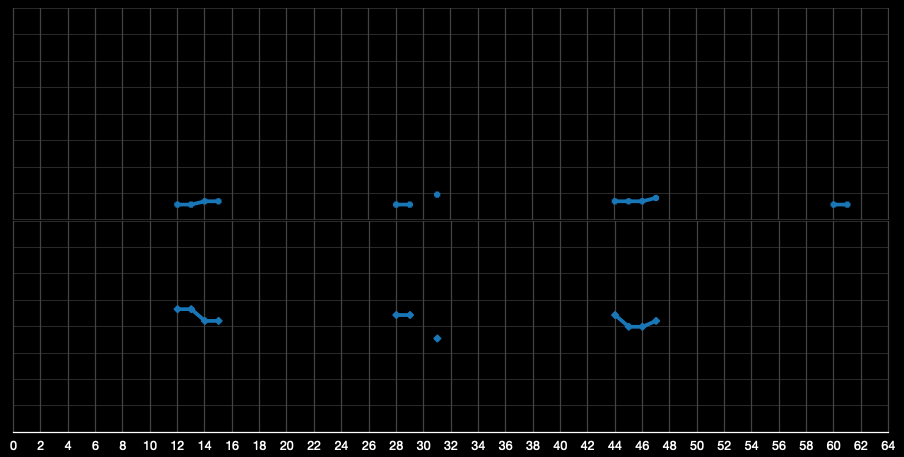
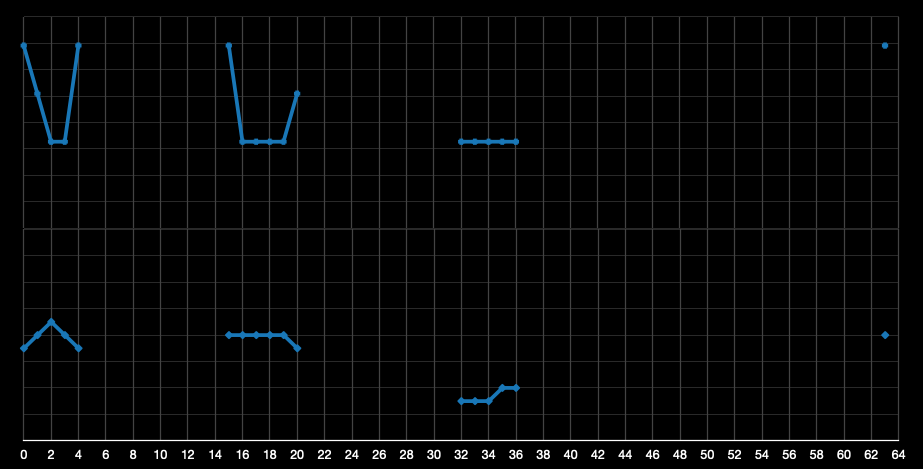
Switching to ADR gave this graph. Note that only 3 gates are visible; one of them was shadowed entirely by a disk further down the pack.
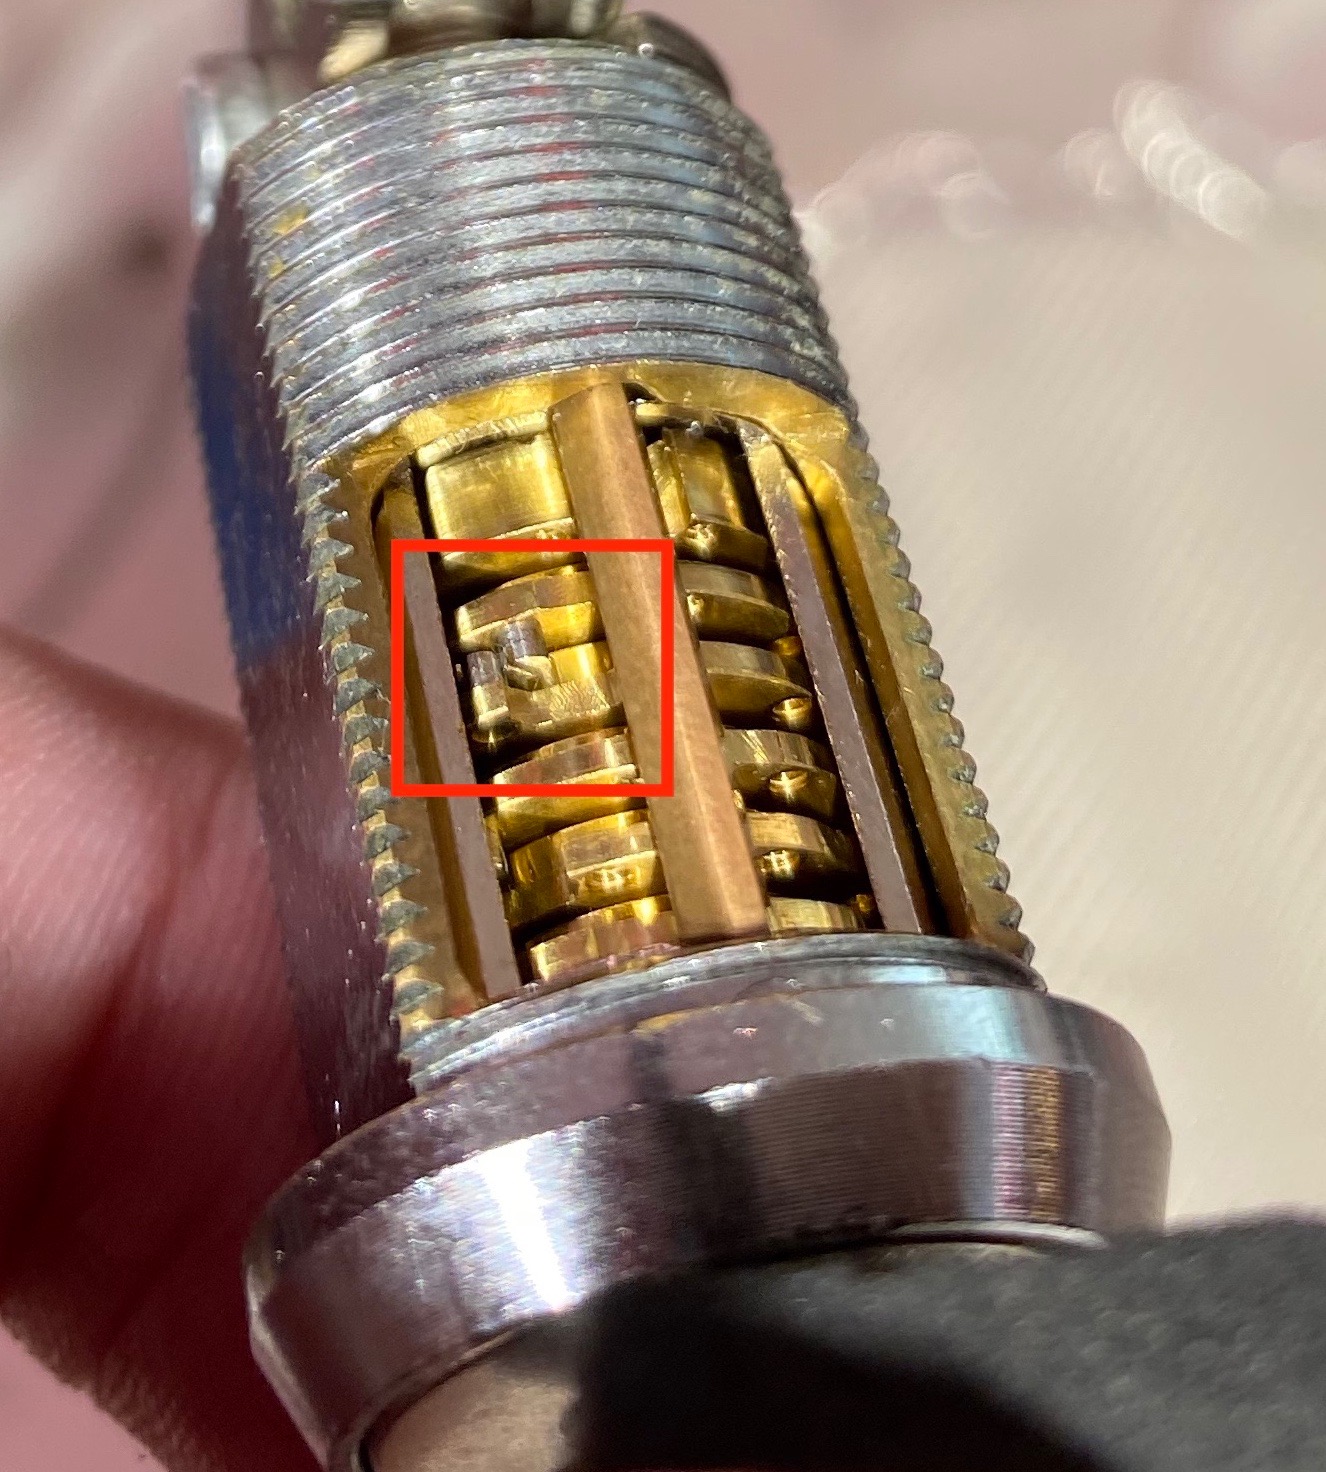
The gate with midpoint R49 gave the deepest reading with the sharpest edges. My theory was that since the false gates are so shallow, that’d be the true gate on some disk. I used my Mk I Eyeball on the cutaway window and noted that it was the gate for d5, so now I could be fairly confident that I should be able to tell the true gate apart from the false ones.
To actually verify this, I started by moving d5 a bit to the left and checked for sidebar binding. After I got worse binding for that, I did the same for d4 and got good binding, then d3 and still got good binding (ie. I essentially did a lo test but with only 3 disks). This satisfied me that I’d probably found the number for d5: R49 / L46
Disk 4
I started the next graph assuming that I’d probably be getting indications from d4, so I dialed d5 to L46 and then the rest to R38 which should be close to the first possible index for the true gate on d4.
Note that gate edges are about 2 increments – ie. drive pin width – off from the gates on d5: there’s a gate edge at R20 here but it’s R18 on d5, there’s a gate edge at R36 here but R34 on d5 etc. This means that this graph is most likely for d4.
The gate with midpoint R2 has the sharpest profile, so I assume that’s the true gate. I do a lo test with just d4 and get worse results, so I figure that my assumption about this being d4 was right.
Disk 4 rotational conversion
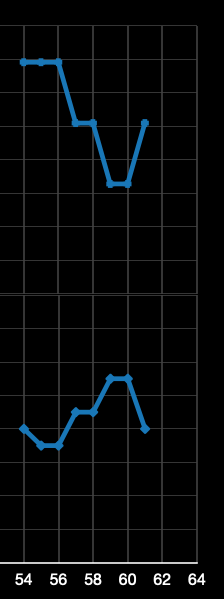
I initially tried doing rotational conversion with my estimation of the drive pin width plus some simple math, but I kept having problems with it so I end up doing it with graphs. This is what the graph looked like for d4 R2, determining the gate midpoint is at L59:
Lucky disk 3
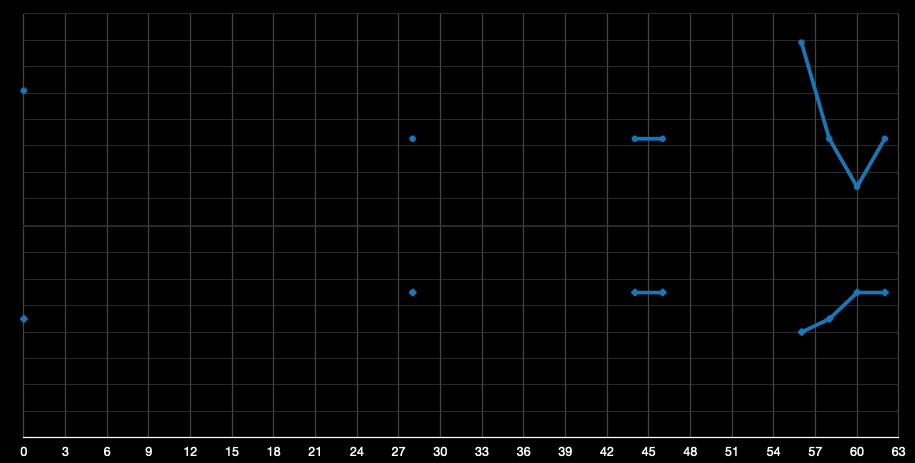
After finding the gate for d4, I dialed d5 @ R49, d4 @ L59, and the rest ADR to R60 which would be the first possible index for the gate on d3:
After measuring a few points around R60 I realized I probably hit the true gate right off the bat since the gate signature was so sharp and deep. I took readings from the midpoints of all the other gates and noted that they weren’t as deep as the one at R60, and after a quick lo test I declared d3 to be R60.
Disks 2 and 1 held no surprises and graphed as the first 3 had.
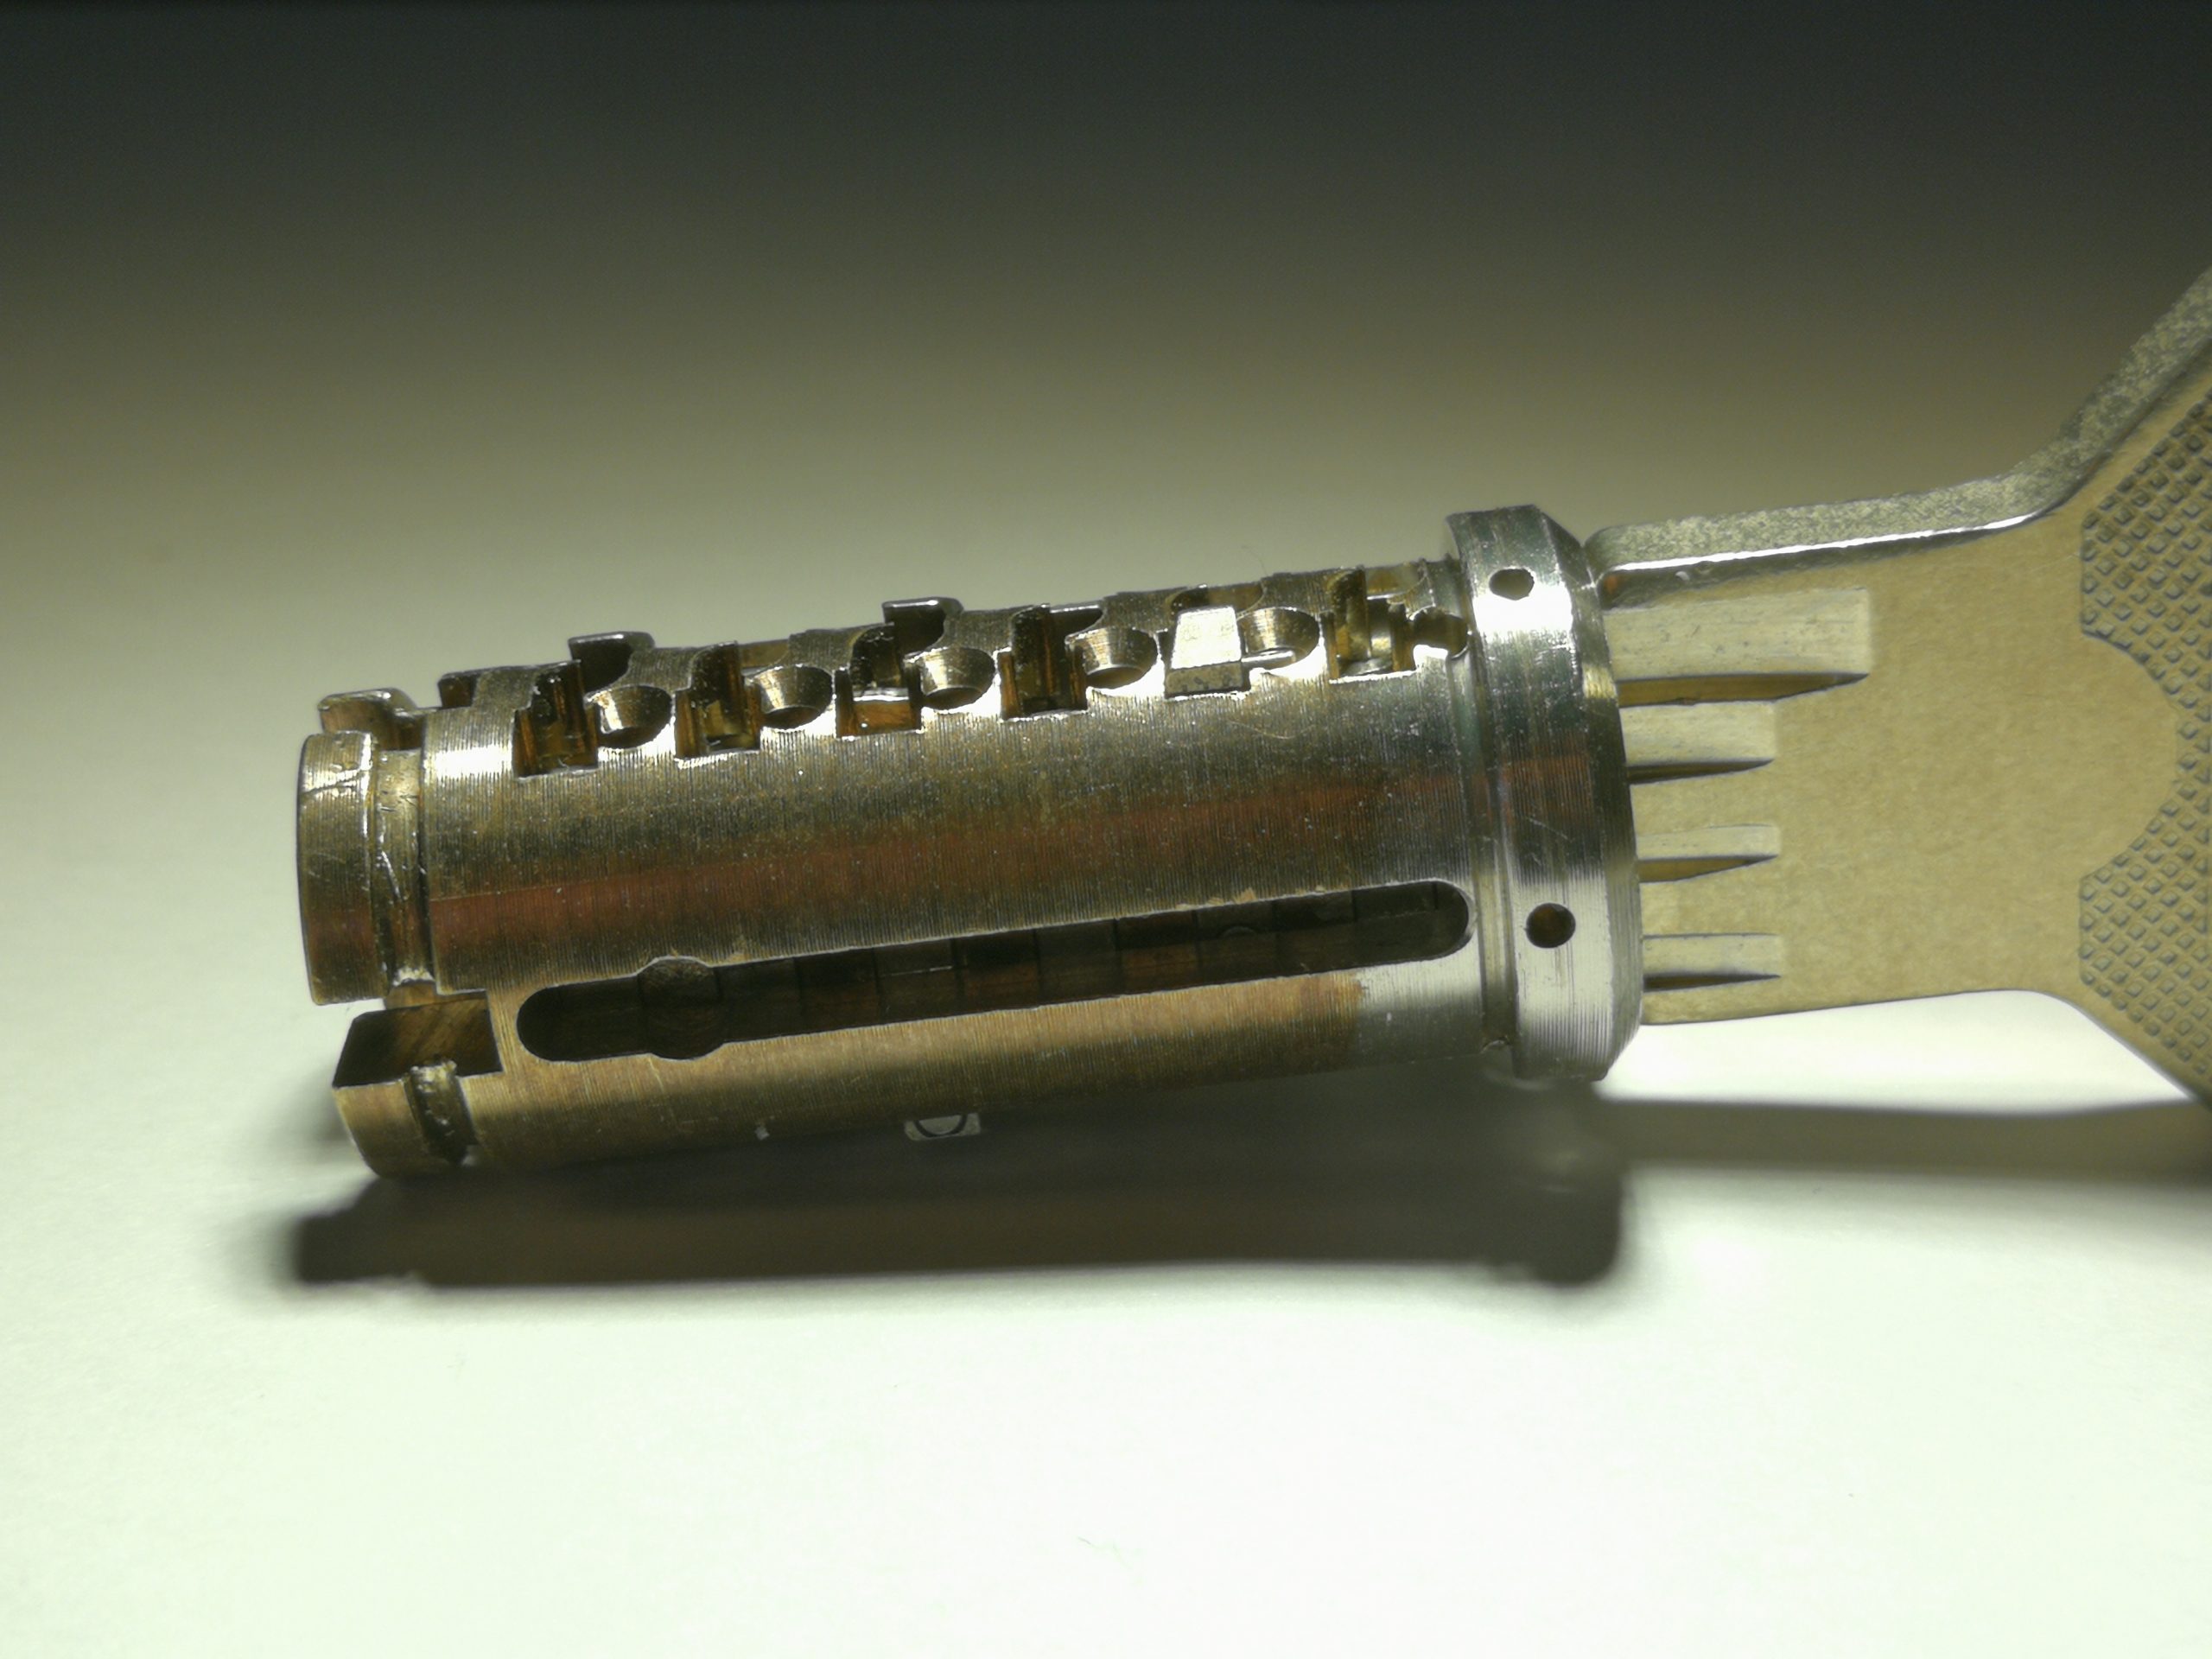
The EVVA Dual is a lock with twelve spring loaded sliders and two sidebars. One on each side. It is an exceptionally hard lock to pick. Reinder Stegen, a gifted picker, found gutting of the Dual error prone and devised a tool to help with gutting the lock instead.
EVVA Dual with the correct key inserted.
For a normal pin tumbler lock you can gut the lock once the plug rotates freely. This can, for example, be achieved by picking, back shimming, or using the key. The EVVA Dual can’t be gutted in the same way as a regular pin tumbler lock as the sliders protrude the cylinder both in the resting position as with the correct key. While the housing has grooves cut for the sliders to slide and rotate this also means that gutting the lock is much harder to accomplish.
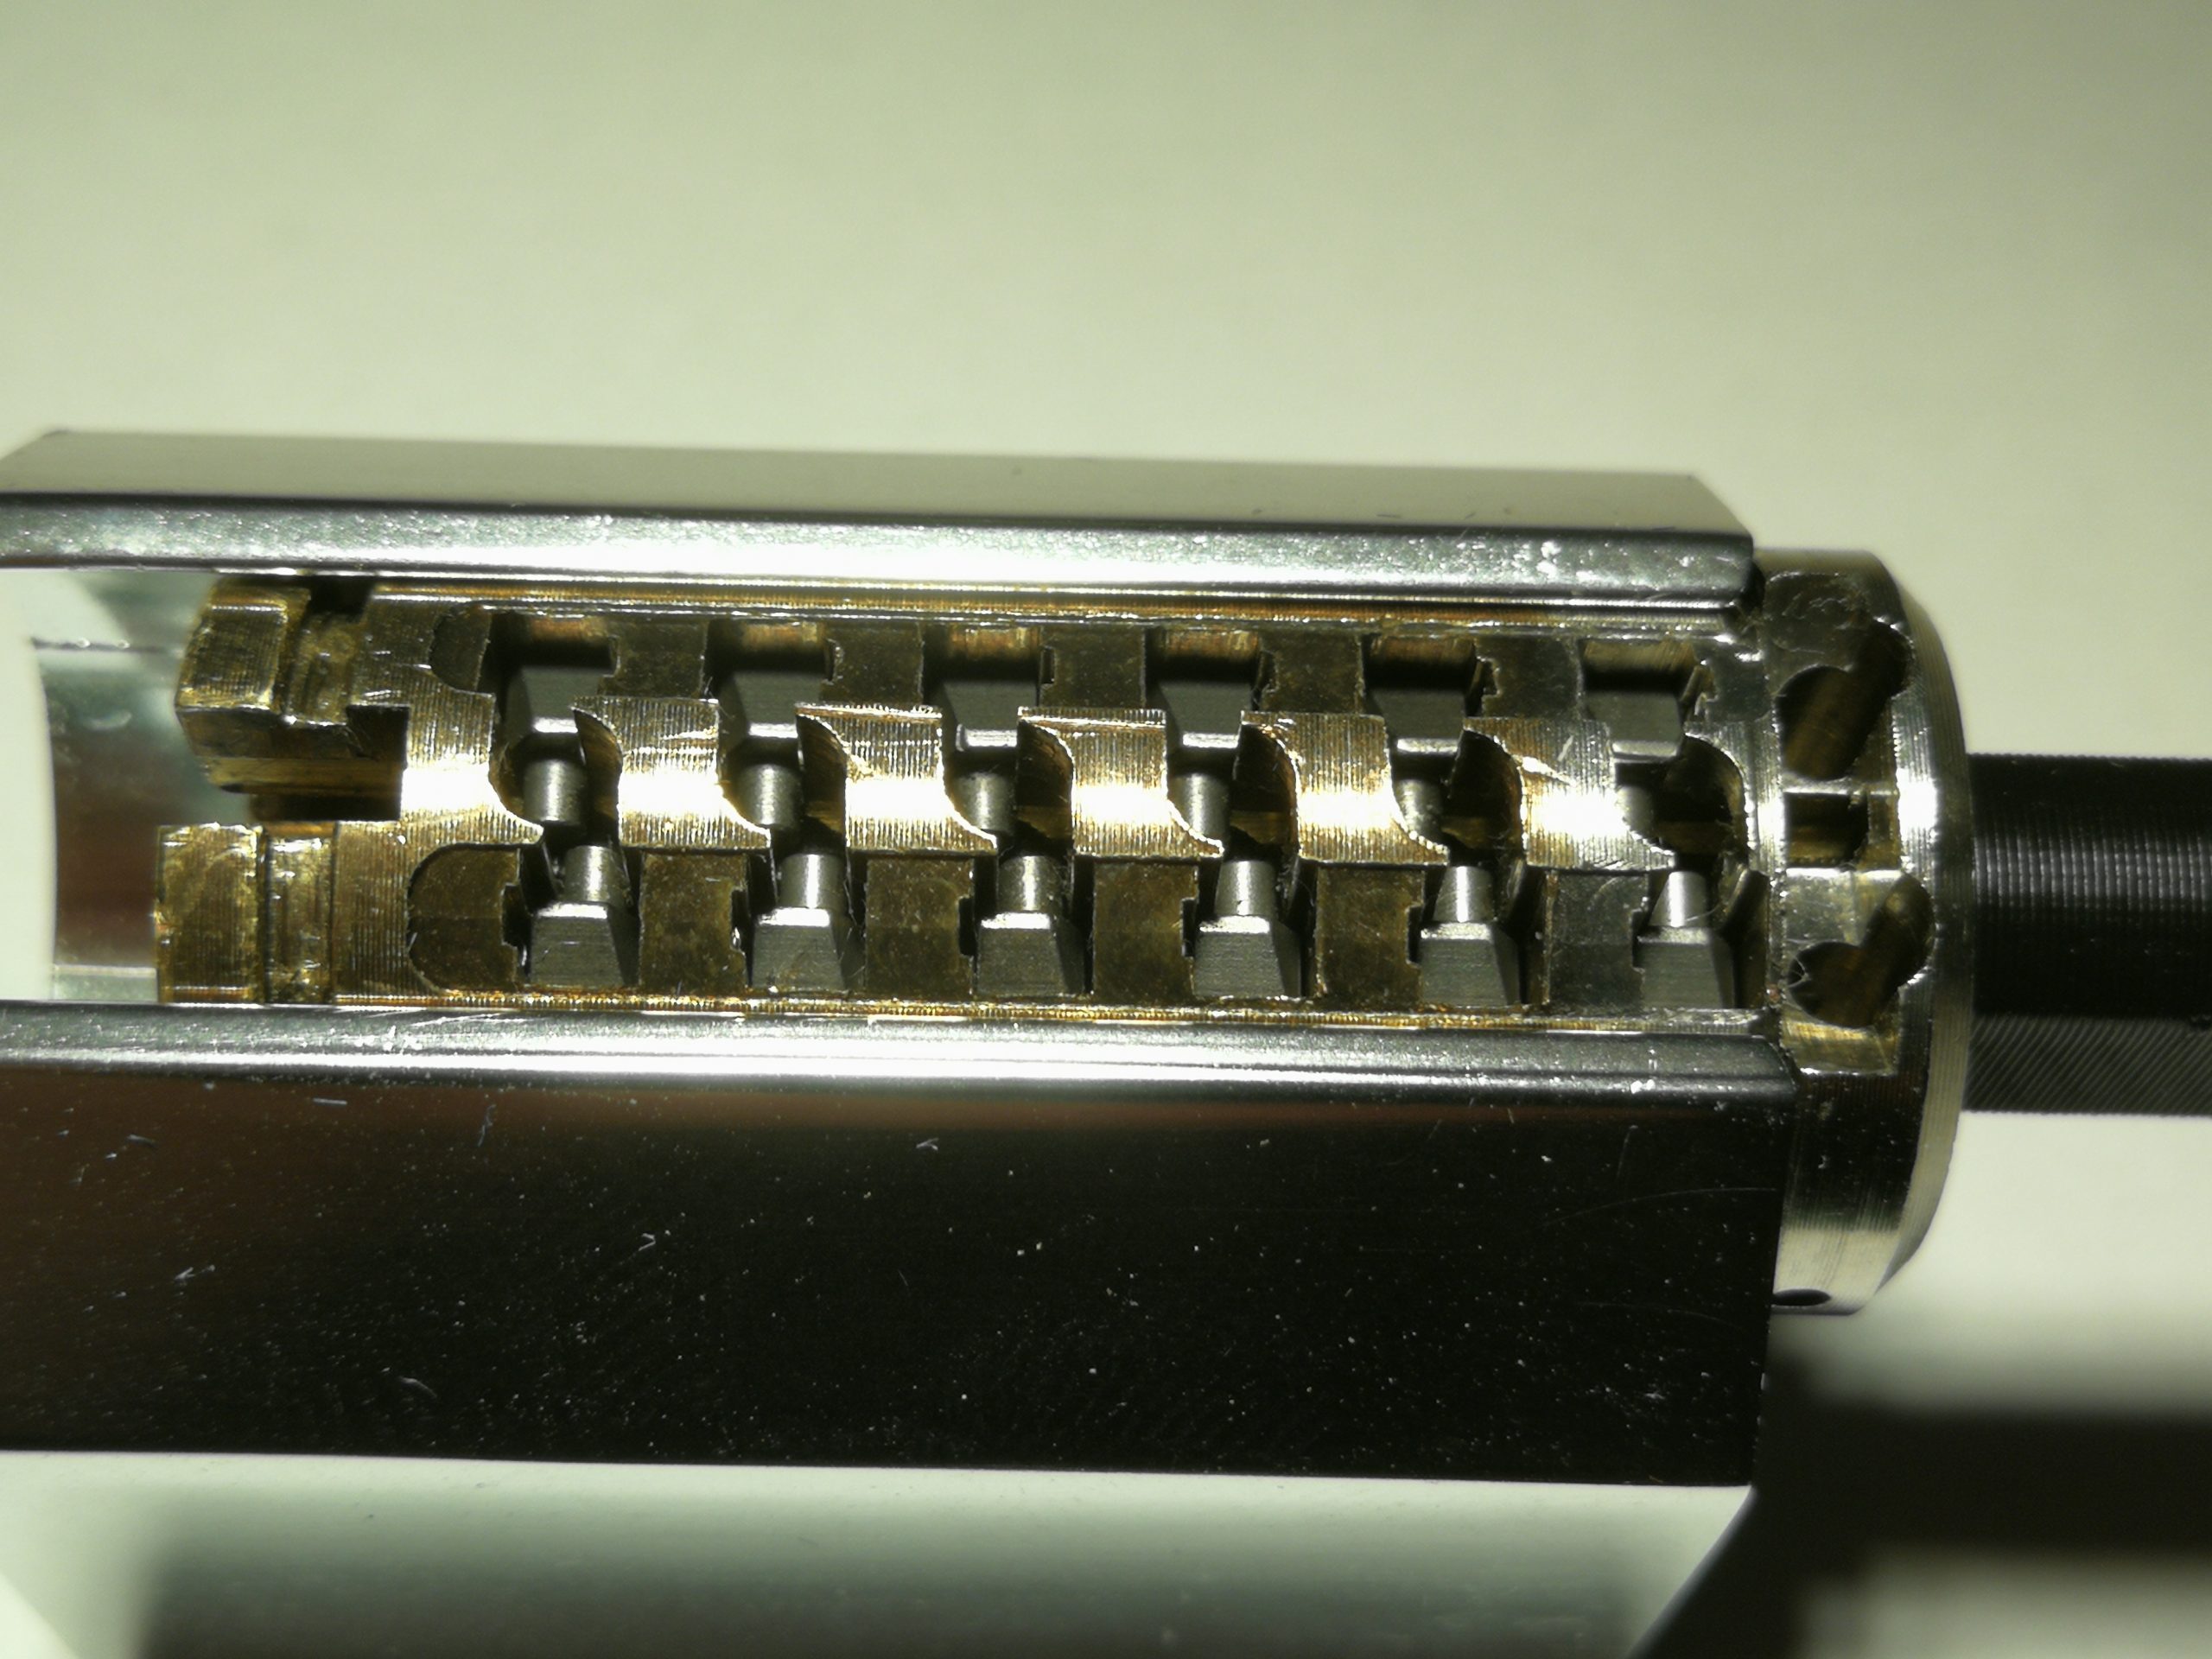
EVVA Dual Gut Key moved the sliders down
You will find more detailed pictures on the EVVA Dual on a recent upload to the Lock Wiki. http://lockwiki.com/index.php/EVVA_DUAL This wiki has been quietly expanding with lots of detailed pictures over the past year. Certainly worth a look at the Abloy Easy and the Chubb Mark IV Manifoil that are recently added.
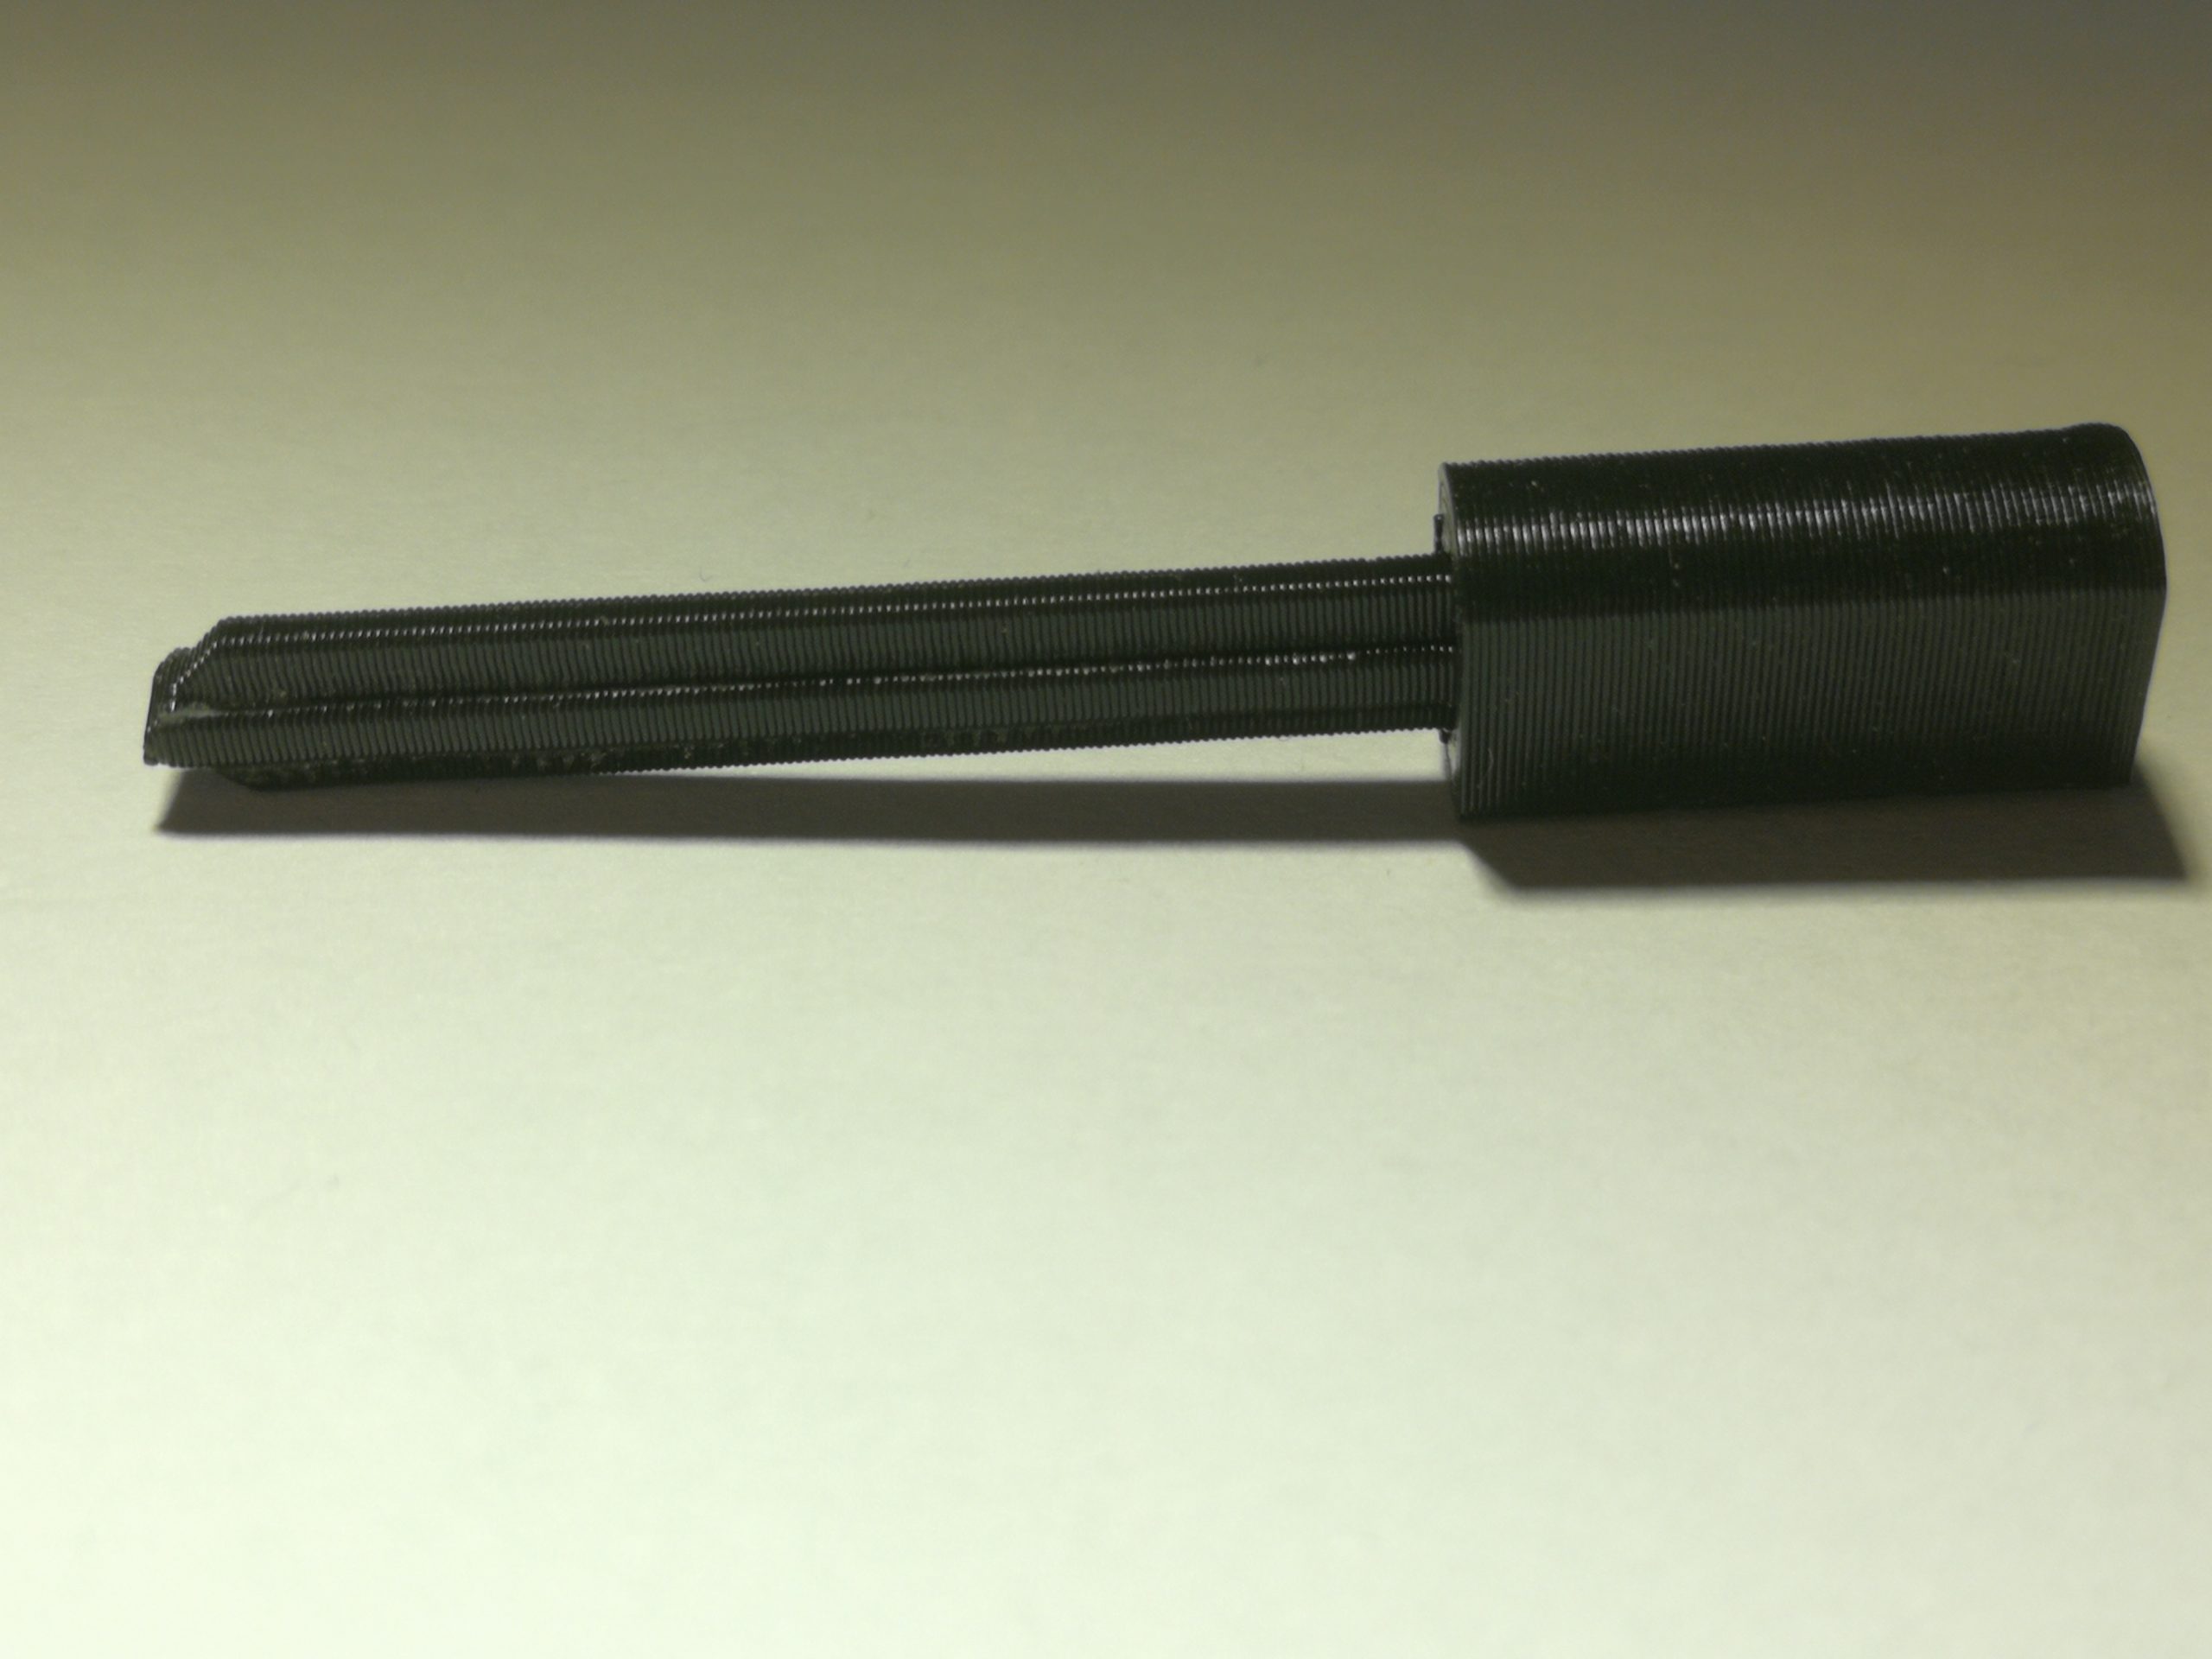
Let’s get back to the EVVA Dual as that’s what this post was all about. The solution to gutting the EVVA Dual is this Gut Key (Set-up key for gutting) designed and 3D printed by Reinder. It solves the problem by moving the sliders down to the fictitious ‘shear line’ making gutting the Dual a breeze.
EVVA Dual Gut Key by Reinder Stegen
Reinder Stegen was kind enough to allow inclusion of the pictures and STL under CCBY4.0.